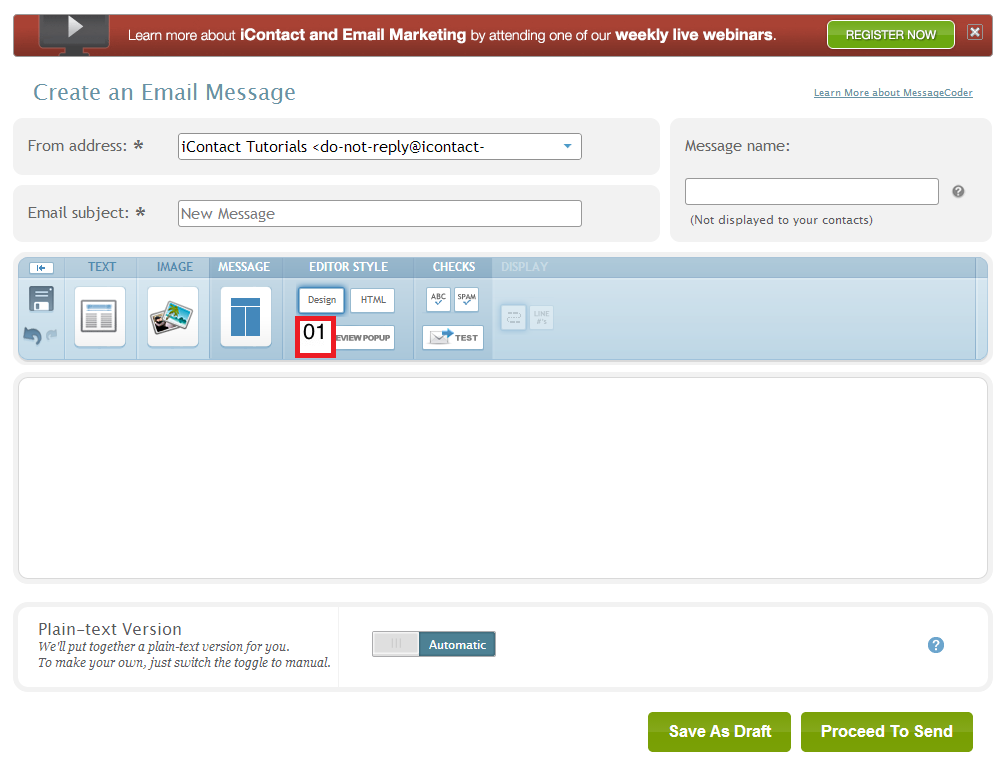
This website offer some workarounds for you to maximize the use of your iContact Email Marketing software. Please bear in mind that iContact has a built-in knowledge base that may contain more updated information. You may want to check it from time to time if you haven't done so. You should find it on the upper right part (near) where your drop down menu is located. This is represented by "01" in the screenshot above.

Thursday, March 13, 2014

Segments


The iContact "Segments" page is where you create your segments. Segments are a powerful tool for targeting specific subscribers. You use segments to create targeted lists based on subscriber data. For example, you would like to send different email messages / newsletters to your male and female contacts but all of them (male and female contacts) are in just one list. Let's say these are your contacts' email addresses:

Male ContactsFemale Contacts
abc@abc.comwxy@wxy.com
bcd@bcd.comxyz@xyz.com


If these email addresses are all contained in just 1 list, and (as mentioned above), to send a different email message for male contacts (abc@abc.com and bcd@bcd.com) and for female contacts (wxy@wxy.com and xyz@xyz.com) you can either create 2 separate lists and move them to the list that represent their genders or create some custom field and segments that will accomplish the task for you. This is just an overview on what you can expect from this cool iContact Email Marketing software feature.


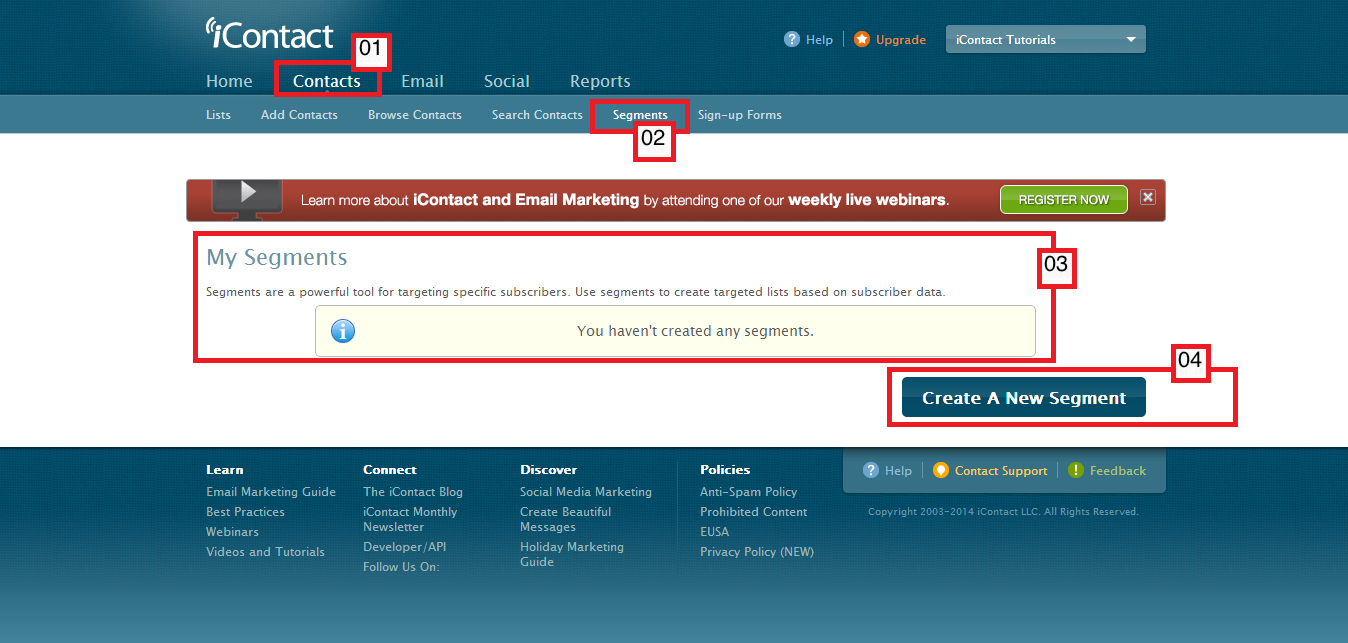
The "My Segments" page can be accessed by clicking on the "Contacts" tab and choosing the "Segments" option that is located on the dark blue bar just below the "Contacts" tab, represented respectively by the 01 and 02 below.


01. The iContact Email Marketing Software "Contacts" tab.
02. The "Segments" option located on the dark blue bar just below the "Contacts" tab.
03. This is the part where you will see all the segments that you have created.
04. This "Create A New Segment" button is the one to click should you need to create a new segment.


Sunday, March 2, 2014

Adding Contacts To Your Lists


Now that you have created your list(s), it's time to add / upload your contacts. Your iContact Email Marketing software allows you to upload contacts one at a time or by group. Further, you may add contacts by group through copy and paste or by uploading / importing a file. At the time of this writing, your iContact Email Marketing software only accepts three file formats; CSV, XLS (not XLSX), and VCF. Sample files are provided for download at the end of this article so you won't have to do a trial and error on what fields to use for your contacts' database.


To add / upload your contacts the your list(s) in your iContact Email Marketing software, please follow these steps:
01. Click on the "Contacts" tab.
02. Click on the "Lists" option on the dark blue bar just below the "Contacts" tab. This should take you to the "My Lists" page.
03. Click on the "Add" link on the right part of the list where you want to add your contact(s). This should take you to your "Add Contacts to My Lists" page (the third screenshot shown below).


Another step to adding / uploading your contact(s) to your list(s) can be accomplished by following these steps:
01. Click on the "Contacts" tab.
02. Click on the "Add Contacts" option on the dark blue bar just below the "Contacts" tab. This should take you to a page with four rectangular sections categorized as "My Lists", "Add Contacts", "Search My Contacts", "My Segments".
03. From the "Add Contacts" category, you should be able to choose among these options; "Upload From File", "One at a Time", "Copy & Paste". From here, each option you choose should take you to these options' respective pages shown on screenshots 4, 5, and 6 below.


If you follow the steps from the first screenshot, your iContact Email Marketing software should take you to your "Add Contacts to My Lists" page (shown below). This page should give you three options on how you may want to upload / import your contacts:
01. Upload Contacts From a File. Choosing this takes you to the "Upload Contacts" page. Should be the 6th screenshot on this article.
02. Add Contacts One by One. This option takes you to your iContact Email Marketing software's "Add One Contact" page, and that should be the 4th screenshot in this article.
03. Copy & Paste Contacts. Choose this option and you should see your "Copy & Paste Contacts" screen, which should be the 5th screenshot in this article.


This "Add One Contact" option allows you to upload / import one email address along some associated information such as the first name, last name, address, phone, and so on.
01. This is the field where you type in the email address you want to add. This field is required.
02. This is the part where you put check(s) on the checkbox(es) on the list where you want to associate the email address you are trying to add.
03. These are the optional fields where you can type in those information associated to the contact you are trying to add.
04. Check this checkbox if you would like iContact to send the contact you are trying to add a "Confirmation Message". More information about "Confirmation Message" is found in a separate article.
05. Once you are sure that every information you have typed in are all correct, you may now click on this "Add Contact" button to add your contact.


In iContact's "Copy & Paste Contacts" page, you can conveniently just copy or cut and paste email addresses from a text or excel spreadsheet file. This option was designed so that even if you have a text file that contain texts that looked like this: "Henry Ford founded the Ford Motor Company and his email address is henry.ford@ford.com. He was married to Clara Jane Bryant. Clara's email address is cjb@ford.com, and so on..."
If you copy or cut and paste such message construction above, the system should detect and upload / import the email addresses from the article which are henry.ford@ford.com and cjb@ford.com. The drawback of this feature is that it has no option for you to type in other information such as the first names, last names, or other necessary information regarding the contact(s).
01. This is the part where you put check(s) on the checkbox(es) on the list where you want to associate the email address you are trying to add.
02. This is area where you paste the above-mentioned texts. Your iContact Email Marketing software will detect the email addresses in a group of texts you have pasted.
03. Check this checkbox if you would like iContact to send the contact you are trying to add a "Confirmation Message". More information about "Confirmation Message" is found in a separate article.
04. Once you are sure that every information you have typed in are all correct, you may now click on this "Add Contact" button to add your contact.


Choosing the "Upload From File" option should bring you this screen. From here you should be able to import / upload your contacts as long as the format is one of the three accepted file formats mentioned earlier in this article.
01. This is the part where you put check(s) on the checkbox(es) on the list where you want to associate the email address you are trying to add.
02. Click on the "Choose File" button and you should be able to search the file you want to import / upload from your computer to your iContact Email Marketing software.
03. Check this checkbox if you would like iContact to send the contact you are trying to add a "Confirmation Message". More information about "Confirmation Message" is found in a separate article.
04. Click on the "Upload Contacts" button once you have finalized your choices from steps 01, 02, and 03.
05. This will be your "Upload History", which should show you the number of contacts you have uploaded when you first started using your iContact Email Marketing software. A "complete" would mean a successful upload, while a "noaction" would mean a failed upload.


The iContact Tutorials Admin team suggests that you use the XLS file format when uploading / importing contacts. Below are sample files that you can download so you would know how the headers are arranged.

XLS Format Sample FileCSV Format Sample FileVCF Format Sample File


If you are curious about VCF files you may want to check a website called: http://vcardmaker.com/. This website is not in any way associated with iContact Tutorials.


Friday, February 28, 2014

Changing The "From Name" And The "From Email Address"


A good email marketing software should allow you to create different "From Names" and "From Email Addresses", and allow you to send email messages / newsletters using whichever "From Name" and "From Email Address" you prefer. For example you run 3 businesses, or let's just say that your company has three main departments and each need to send out email messages / newsletters to their respective target audience.

For this example we will use the 3 imaginary departments of iContact-Tutorials:
1. iContact Tutorials
2. iContact Research
3. iContact Tutorials R&D

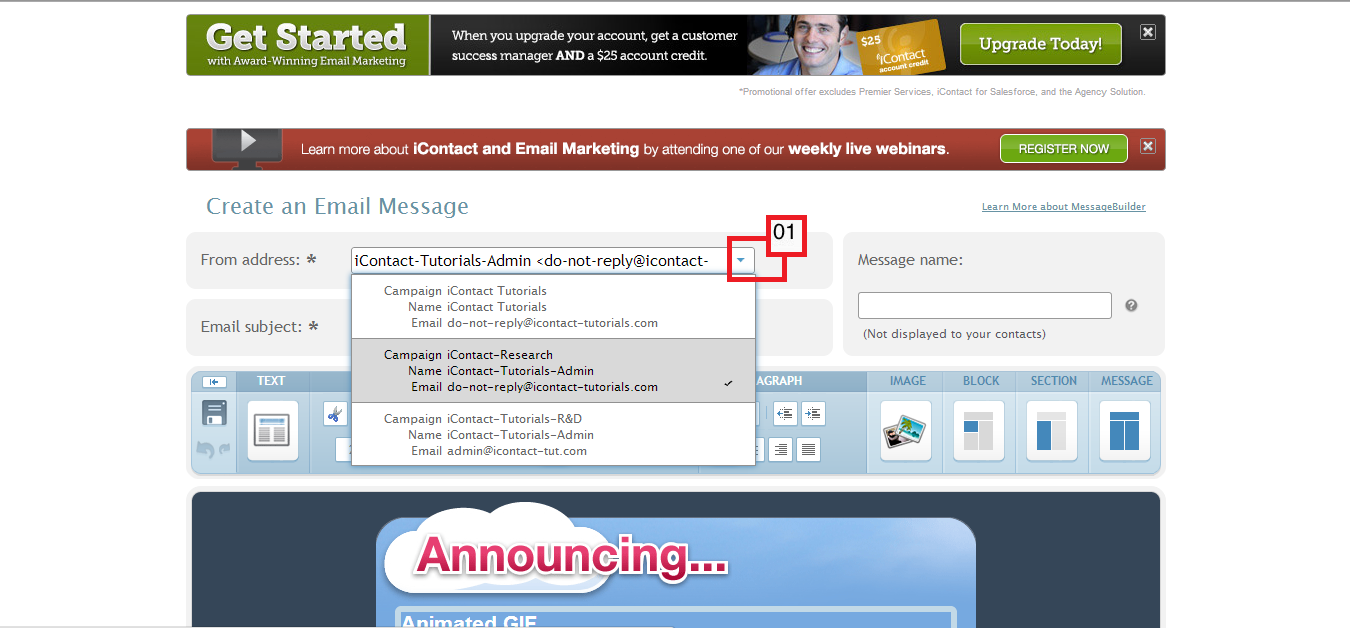
For the sake of formality, it is just proper to use multiple "From Names" / "From Email Addresses" for each of the above-mentioned departments. The screenshot below shows the "From Address" field that can be seen on the upper part of your iContact's message editor.
01. Clicking on the small arrow icon pointing down on the left part of the "From address: *" should show a drop-down selection of all the "From Names" and "From Email Addresses" you have. These "From Names" and "From Email Addresses" are also known as "Campaigns".


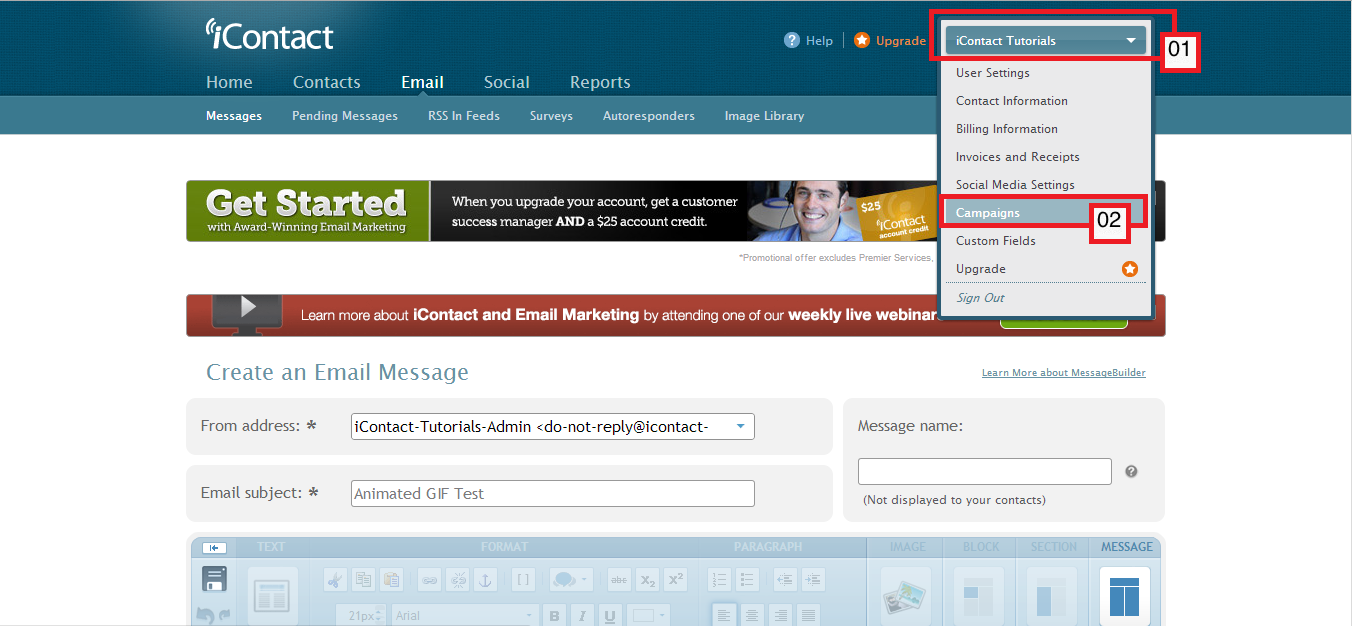
To have multiple "From Names" / "From Email Addresses" to use we have to know where and how to create or edit "Campaigns" on your iContact Email Marketing software. The first two steps for creating / editing are:
01. Click on the small arrow icon on the upper right part where your name appears. This should show a drop-down menu.
02. Click on the "Campaigns" option from the drop-down menu. This should take you to the "Campaigns" page.


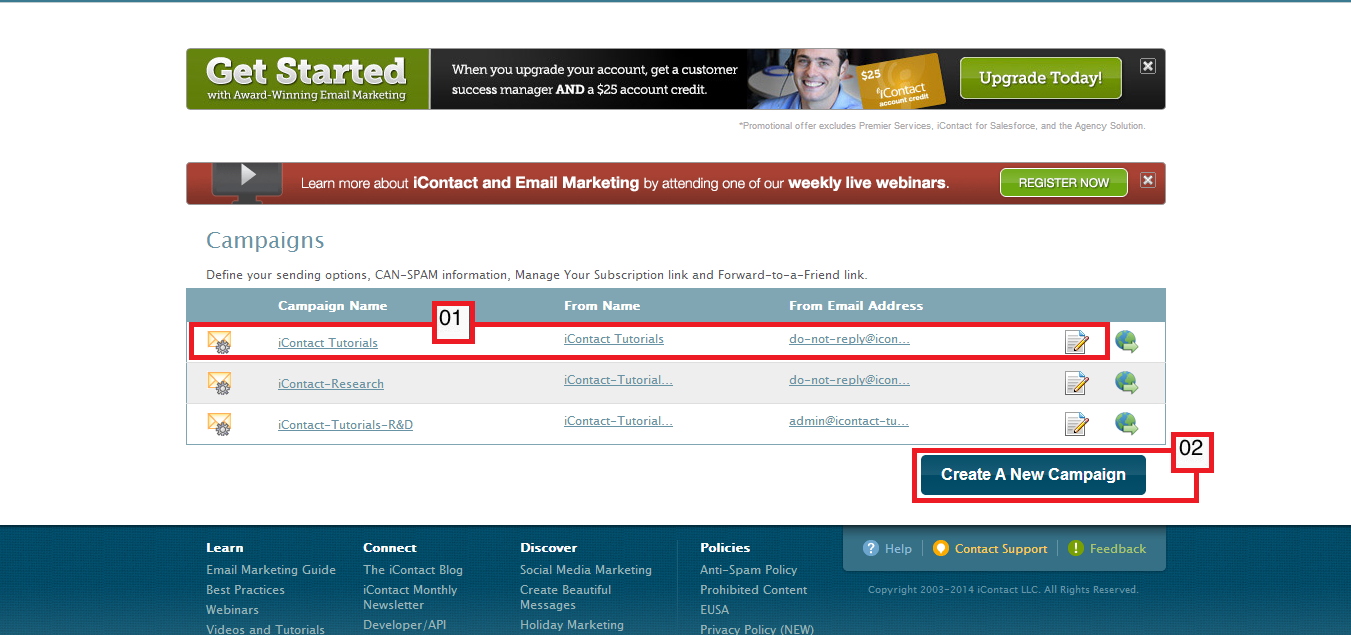
Once in the "Campaigns" page you may now create or edit your campaigns. The admin of iContact-Tutorials recommends to just maintain a maximum of three campaigns, unless one needs more. The main reason is that these "Campaigns" cannot be deleted.
01. Clicking an clickable links or icons here should allow you to modify the corresponding campaign.
02. This "Create A New Campaign" allows you to create a new campaign on your iContact Email Marketing software.


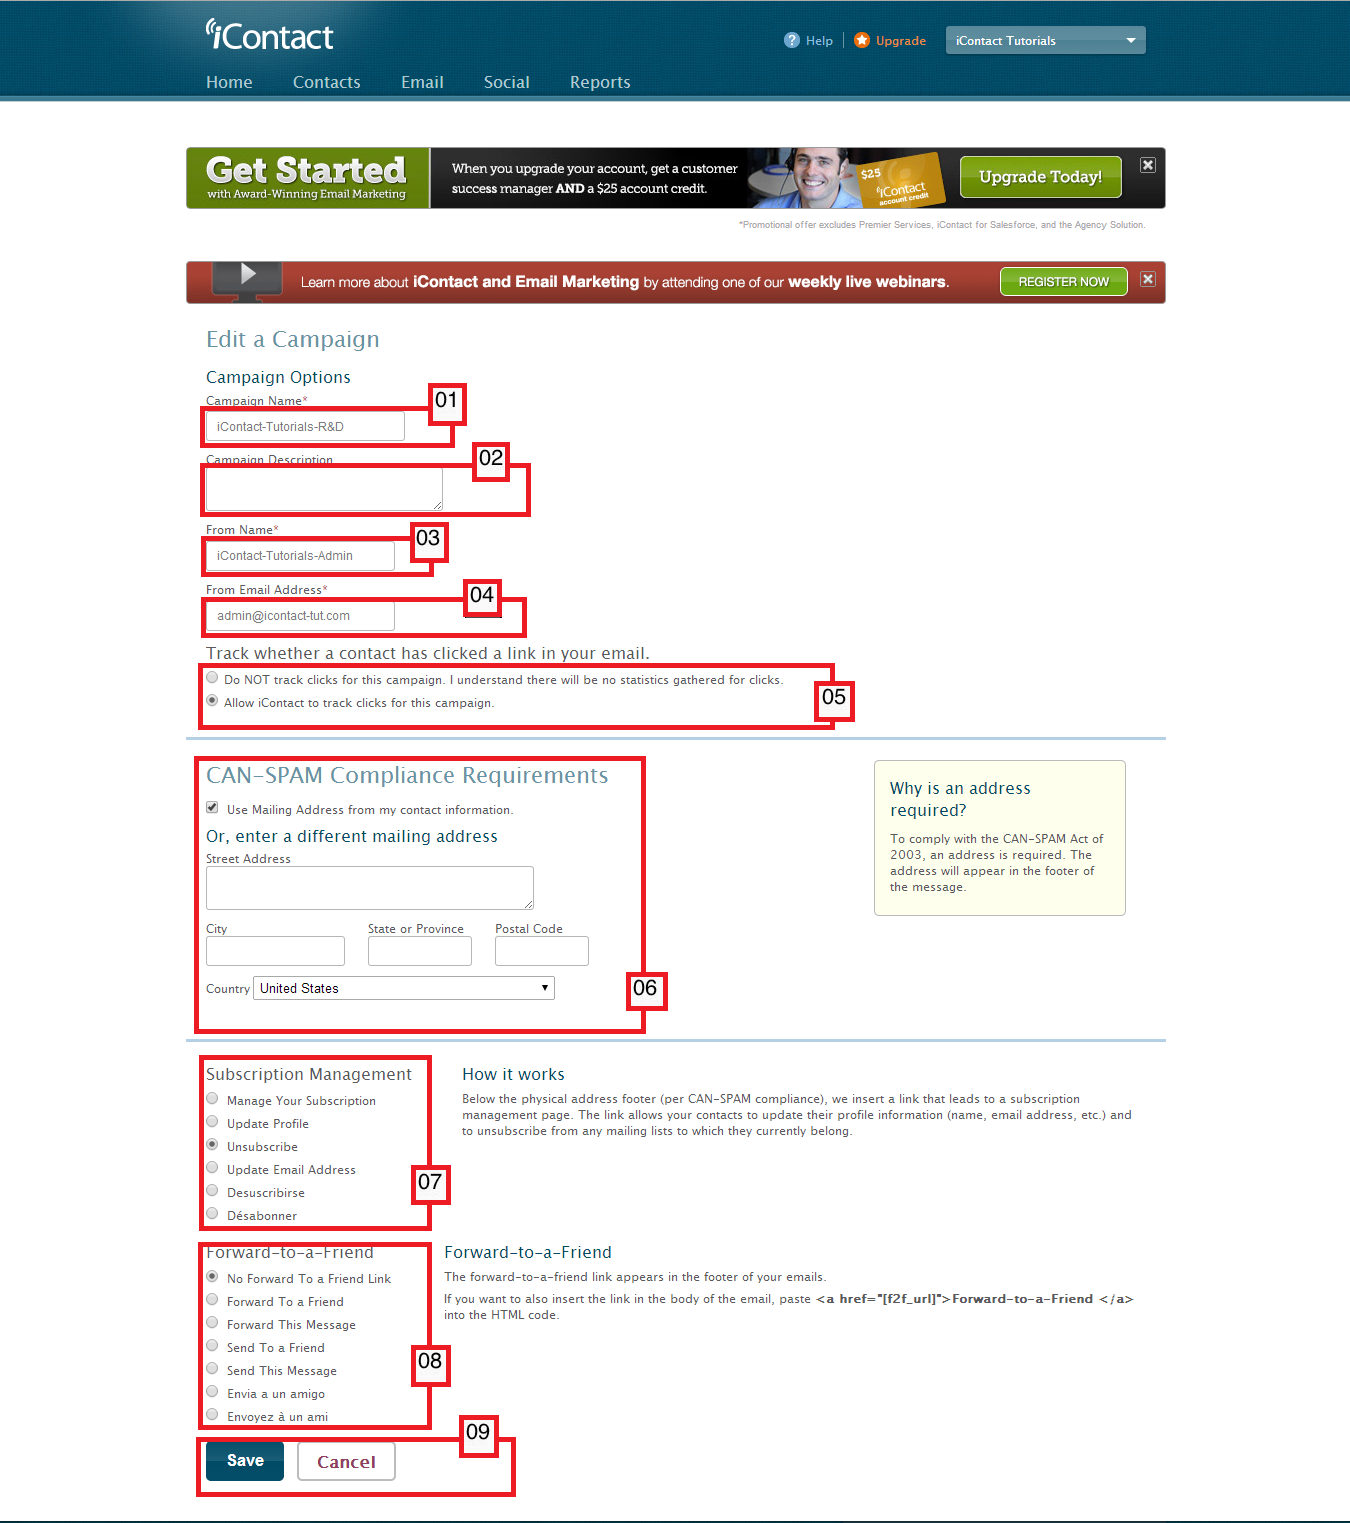
The instructions from the above-mentioned screenshot should take you to your iContact Email Marketing software's "Edit a Campaign" page. From here, you should be able to type in the information that will be associated with the campaign that you are creating/editing.
01. "Campaign Name", this field is required. The function of this is no other than to put a name to the campaigns that you are creating.
02. "Campaign Description" is optional but then again, some extremely organized people finds typing descriptions useful.
03. "From Name", this field is required. This is the part where you type in the name that will show on the "From Name" field of the email messages / newsletters you will be sending.
04. "From Email Address", a required field where you type in the email address that you would like to appear on the "From Email Address" fields of your recipient's email client.
05. From here you can set your iContact Email Marketing software to track or not track the clicks that your recipient's would be doing.
06. Under the section 4 of the CAN-SPAM Act of 2003 (http://www.business.ftc.gov/documents/bus61-can-spam-act-compliance-guide-business): "Your message must include your valid physical postal address. This can be your current street address, a post office box you’ve registered with the U.S. Postal Service, or a private mailbox you’ve registered with a commercial mail receiving agency established under Postal Service regulations."
It is here where you type in the address for your business.
07. Going back to the sections of the CAN-SPAM Act of 2003, particularly on section 5: "Your message must include a clear and conspicuous explanation of how the recipient can opt out of getting email from you in the future. Craft the notice in a way that’s easy for an ordinary person to recognize, read, and understand. Creative use of type size, color, and location can improve clarity. Give a return email address or another easy Internet-based way to allow people to communicate their choice to you. You may create a menu to allow a recipient to opt out of certain types of messages, but you must include the option to stop all commercial messages from you. Make sure your spam filter doesn’t block these opt-out requests."
This is the part where you setup the word or phrase that your recipients need to click in the event that they no longer want to receive email messages from you or update their subscriptions from you.
08. "Forward-to-a-Friend", should you choose to have one - this feature should put a link that your recipients can use if they want to forward (to their friends) the email message / newsletter you sent them. The importance of this feature is discussed in a different article.
09. Your usual "Save" and "Cancel" buttons.


Just fill out all the required fields from your "Edit a Campaign" page, then click on the "Save" button described from the screenshot above then you're done. Nothing fancy.


Creating A List


List is one of the most important aspects of email marketing as it is the easiest tool you can use to categorize your email contacts. The other tool being "Segment", is discussed on a different article. Let's say you have 500 contacts coming from different field of endeavors such as gaming, academics, government, and aerospace. 100 of them came from the academics sector, 50 from the government, 100 from the aerospace sector, and 250 from the gaming population for example. What one may want to is to create 4 different lists, and then associate all the 500 contacts with their respective list.


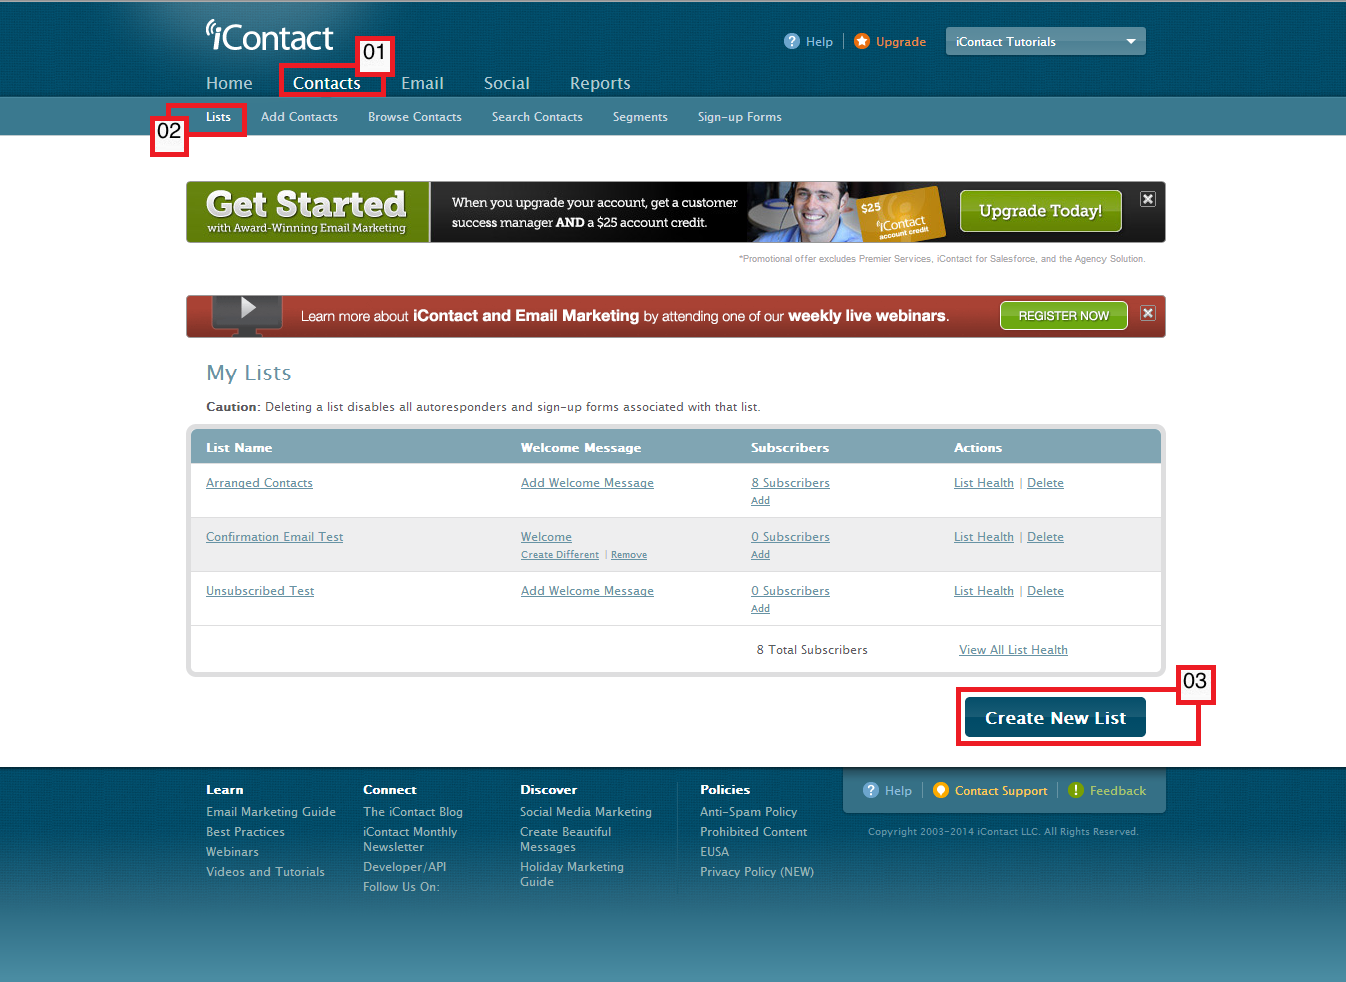
Creating lists using your iContact Email Marketing Software is very straightforward. To create a list on your iContact account, please follow these steps:
01. Click on the "Contacts" tab. This should display the "Contacts" tab's options on the dark blue bar below it.
02. Click on the "Lists" option from here, which should take you to your "My Lists" page.
03. Click on the "Create New List" button. This should take you to your "List Settings" page.


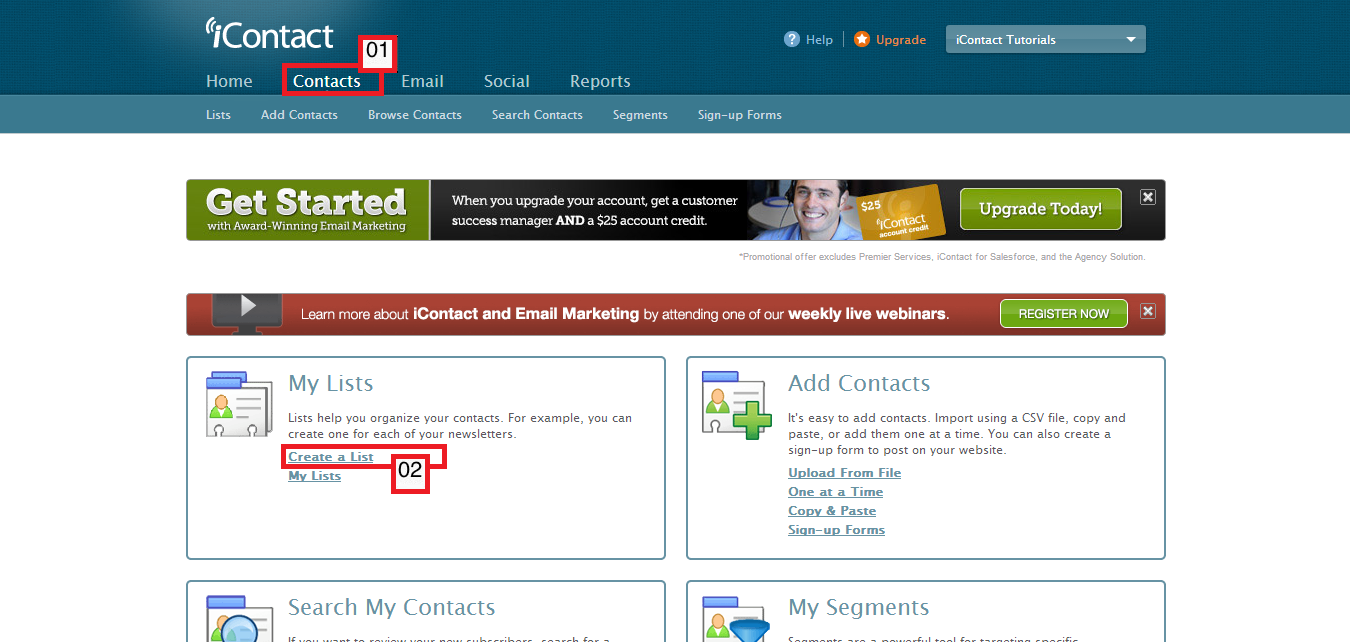
Another option would be:
01. Click on the "Contacts" tab. This should display the "Contacts" tab's options on the dark blue bar below it.
02. Click on the "Create a List" option that shows from the "My Lists" part. This should take you to your "List Settings" page.


The two above-mentioned set of instructions should take you to your "List Settings" page, where you can type in your preferred information for your list.


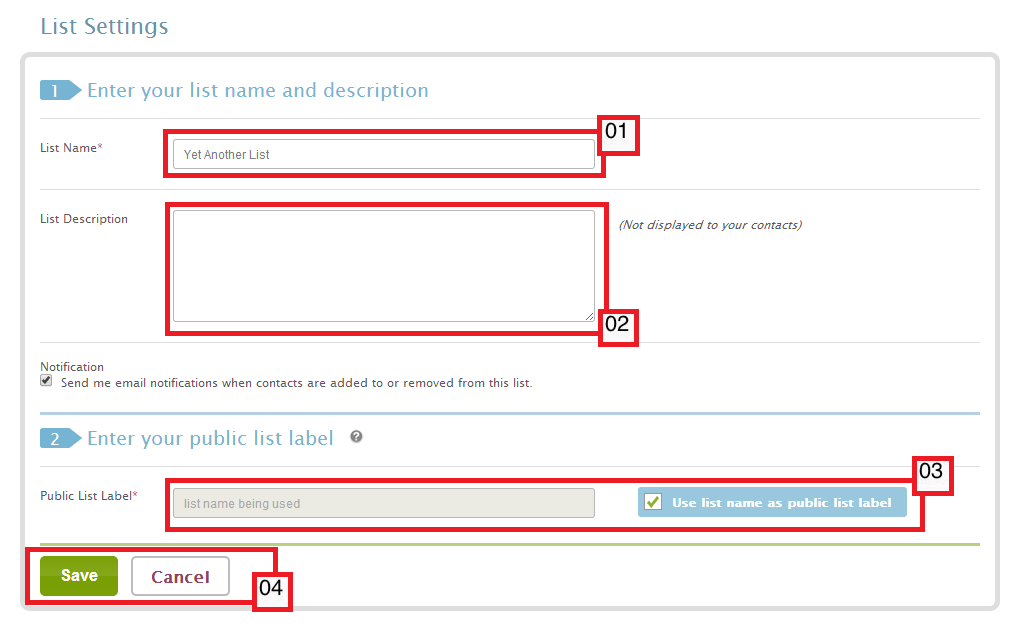
Once you are on your "List Settings" page:
01. The very first information you need to provide your iContact Email Marketing Software is your preferred name for the new list that you are creating. This field is required.
02. The next field is your "List Description". Although this field is not required, some extremely organized people finds it useful filling this field out. You may just want to type in some descriptions that will describe what type of contacts your lists will contain.
If you name your list "Gaming", then you may want to put in some texts on the description. Something like, "These contacts are hardcore video game players."
03. "Public List Label" is also optional. This will be a name for your list that will be seen by your contacts on their "Manage Your Subscription" pages.
04. Last but not list, you may click on the "Save" or "Cancel" buttons which should take you back to your iContact Email Marketing Software's "My Lists" page.


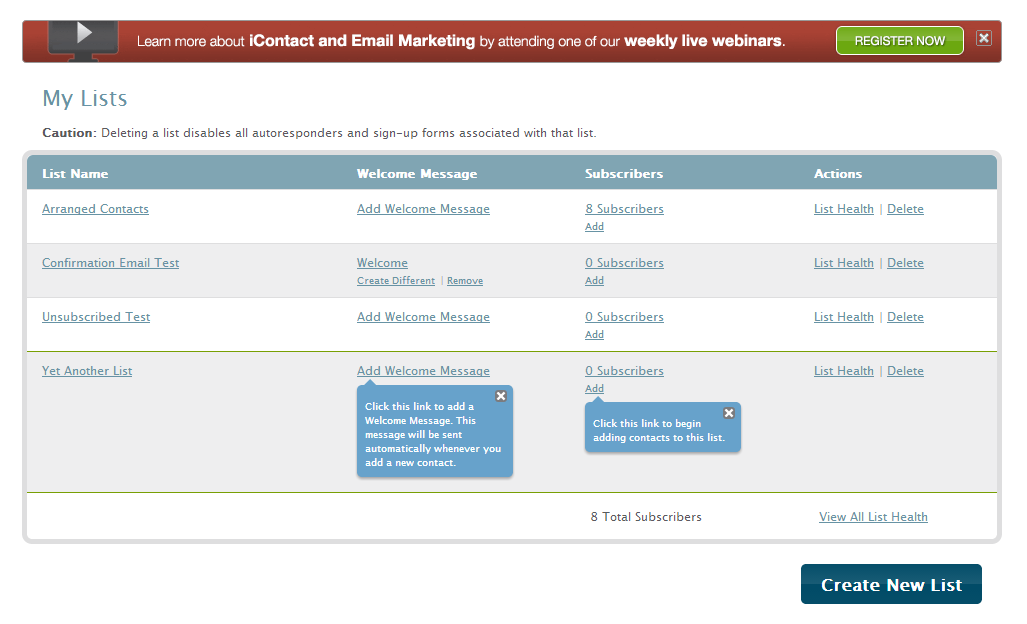
From this "My Lists" page you should be able to perform a number of tasks like:
1. Creating another list by clicking on the "Create New List" button.
2. Delete unwanted/unneeded list(s). This is true only if you have more than 1 list as the system will not let you delete if you only have 1 list in your "My Lists" page.
3. Add a "Welcome Message" to one or more of your "Lists". "Welcome Messages" are those sent to your contacts the moment they are added to your list(s) that has this option activated.
4. View the health of your list(s). List health would be composed of information such as your "Subscribed", "Unscubscribed", "Do Not Contact", "Pending", "Bounced", "Growth", "Total". This will be discussed in another article.
5. Go to the "Add Contacts to My Lists" page by clicking on the "Add" link that is found on the right part of each respective list name(s) you have.
6. Go back to the "List Settings" page of every list you have by clicking on the list name.


Now that you are done with creating your custom lists, it is time for you to add contacts to your iContact Email Marketing software. The "Adding Contacts To Your Lists" tutorial should guide you through.

Thursday, February 27, 2014

The Home Tab


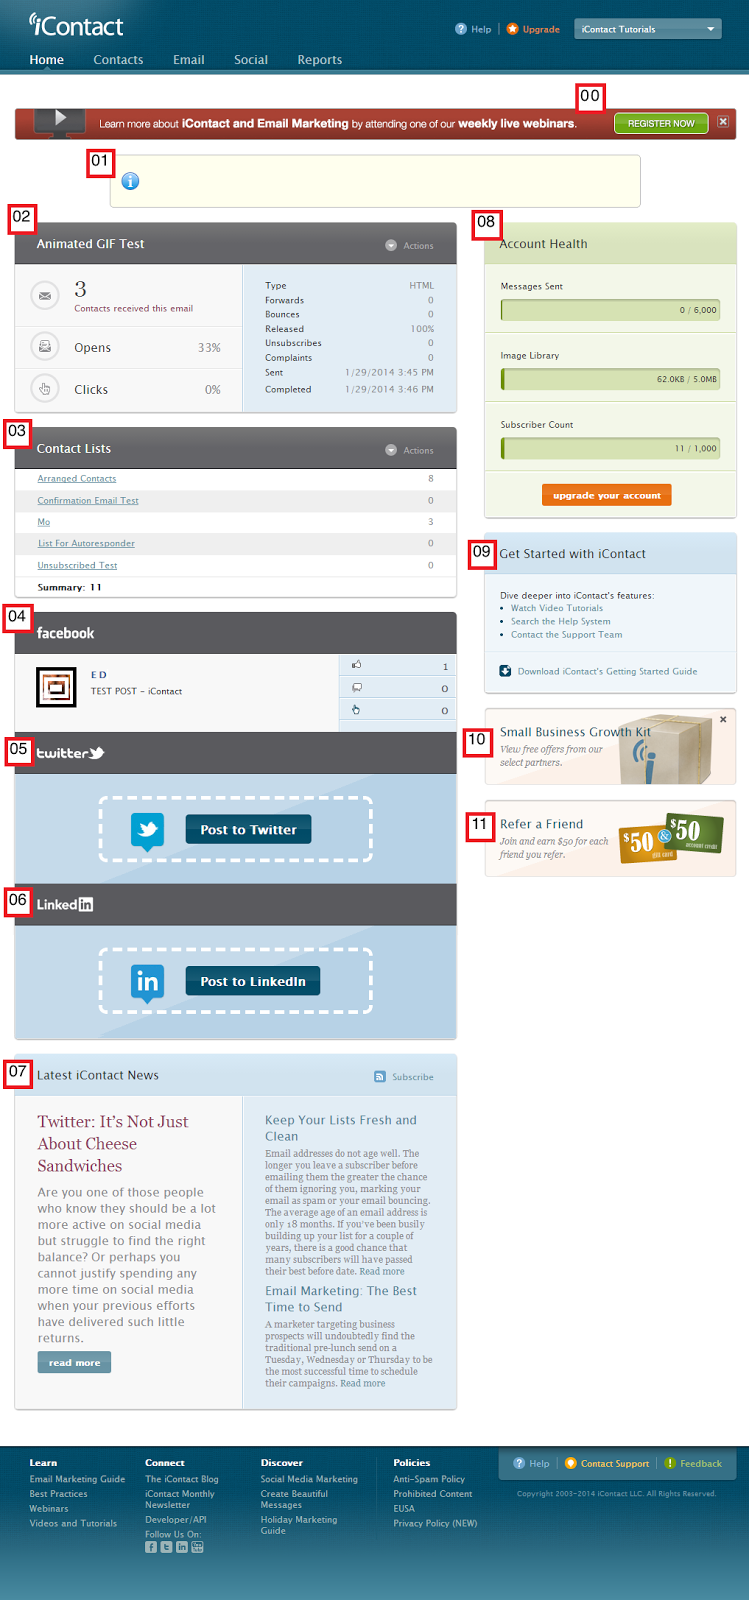
This is the first page that you will see the moment you login to your iContact account. The system will also take you to this page when you click on the "Home" tab.

00. This brings you to a registration page if you want to take advantage of the official webinars offered by iContact.
01. Notifications such as error messages, billing reminders, and so on are normally displayed on this part.
02. This portion shows you the summary of the last email message that you sent to your recipients.
03. This portion shows a summary of your lists.
04. This is the part where you will see the contents that you posted on your Facebook account or Facebook Fan Page.
05. Yet another portion that shows you what you just posted on your twitter.
06. If you just posted something on your LinkedIn using iContact, you should see a summary here.
07. From time to time, iContact may have some surprises for their subscribers. You should see what's new or some latest iContact news from here.
08. This is the "Account Health" portion, which should display the information about the number of your Messages Sent, the current available capacity of your "Image Library" and your "Subscriber Count". The "upgrade your account" button shown here is handy should you need to upgrade / downgrade your iContact subscription.
09. This is the part where you can access iContact's video tutorials, help system, a link to take you to iContact's Tools and Support page, and a downloadable guide (in PDF format) for starters.
10. Some promotions may be available on this portion from time to time.
11. This portion gives you a link to learn more information about iContact's "Refer-A-Friend Program".


iContact "Home" tab should show you the latest summary of what is going on with your iContact account. Nothing more, nothing less.

I Forgot My iContact Username And / Or Password


Nothing can be more frustrating other than forgetting a username and / or password that you may have been using for a number of years. Add the fact that you are quite excited and in extreme hurry to send out some email messages / newsletters to your contacts. Although resetting forgotten password in iContact is really straightforward, this is not an assurance that nothing can go wrong. Read along to find out how this works so you will know how to resolve scenarios such as this.


The perfect scenario that you should encounter when resetting your iContact account's password goes this way:
00. You typed in the web address / URL http://www.icontact.com/ on your internet browser's address bar, then your internet browser then takes you to iContact's main website.
01. Click on the "Log In" on the upper right corner of your iContact's website. This should take you to a page where you can type in your username and password.


Now this is how the actual login page of iContact look like at time of this writing.
01. You just need to click on the link that says "Forgot your password?" so you will be taken to the "Lost Password" screen.


Once you see iContact's "Lost Password" screen, everything should be just as simple as:
01. Typing your iContact username on the field that says "Username".
02. Then clicking on the "Send Reset Instructions" button.


If all goes fine, a "Success" page will be shown (like the one shown below).


Then it will just be a matter of checking the email address associated with your iContact account, and clicking on the password reset link sent by iContact.


The password reset link would then take you to a page that would most likely look like this screenshot below, and from here you can just:
01. Type in the new password of your choice.
02. Re-type this new password that you have selected to be sure everything was encoded correctly.
03. Click on the "Save Your New Password" button, and you should be able to login to your iContact account with ease.


Life is so simple in a perfect world scenario. Unfortunately, a perfect scenario doesn't always happen - not in email marketing. Here are the things that can go wrong if you are trying to reset your iContact password:
  • You forgot your iContact username but you still know the email address associated with your account.
  • You forgot your iContact username and the email address associated with your account.
  • You forgot the email address associated with your account but you still know your username.
  • You cannot locate where the password reset instructions was sent, not even in your spam or trash folders.
  • You are unable to locate the password reset email sent by iContact.
  • Other loading issues mainly caused by your internet browser or operating system.


These are the possible solutions / path that you may take depending on the above-mentioned issues:
You forgot your iContact username but you still know the email address associated with your account.
-This is the easiest to resolve among the issues mentioned above. You just need to contact the iContact Technical Support department (call them, chat with them or email them) and tell them that you forgot your username, and that you would like them to send this username to the email address associated with your iContact account. An iContact Technical Support Representative should be able to send your forgotten username (along with some instructions on how you can reset your password) to the email address associated with your account. Please take note that an iContact Technical Support Representative will NEVER (even if you shout or curse them over the phone) send your username to any other email address other than the one associated with your iContact account, this is to protect your account and iContact as a whole. Besides, they are legally bound to the email address associated with your account.

You forgot your iContact username and the email address associated with your account. or You forgot the email address associated with your account but you still know your username.
-This can be a dead end. If you don't have a way to gain access to the email address associated with your iContact account anymore, then you need to secure some sort of court order that will tell iContact to change the email address associated with your account. Without this court order, you may want to create a new iContact account and say goodbye to the old one.
On the other hand, if you can still recall the email address that is associated with your iContact account but cannot gain access to it. You may want to coordinate with the I.T./email personnel in charge of the email domain to see if they can reinstate the email address so you can your iContact account.

Please check "The Email Address Associated With Your iContact Account" if you don't know how / where to find the email address associated with your iContact account.

You are unable to locate the password reset email sent by iContact.
-So you have checked your inbox, and folders such as spam and junk and no password reset email is present. There can be three major possibilities for this to happen:
1. Your IP address is on a blacklist. Thus, may or may be unable to receive email messages coming from a number of senders. Please check our guide on how to check if your IP address is on a blacklist.
2. Your email address administrator has implemented some policies like blocking any email messages coming from an email marketing company such as iContact. For this, you need to coordinate with your email administrator and have them whitelist iContact's sending domain which is "icpbounce.com". This "icpbounce.com" is a group of IP addresses used by iContact to send your email messages / newsletters to your contacts / recipients.
3. The email client that you are using may have been set up to forward received messages to another email address. This can be weird but there are people who tends to forget that they have configured their email client to do this.

Other loading issues mainly caused by your internet browser or operating system.
-Depending on what is really going on, the solution for this would vary from just clearing your internet browser cache to even re-installing your operating system worse comes to worst.

Wednesday, February 19, 2014

Removing The Underline From Your Hyperlinks


In HTML, hyperlinks are normally underlined by default. There are times when you want to get rid of these underlines as they may not look good for the way your template is designed, or for any other reasons. People with experience in coding with HTML should not have difficulties doing this. Luckily, this tutorial is intended for those without HTML knowledge.


Before we proceed, please familiarize yourself with the tools on top of your "Message Builder" and "Message Coder".

Message Builder:
01. The "Message Builder" will have five options on top that goes: "TEXT", "IMAGE", "BLOCK", "SECTION", "MESSAGE".


Message Coder:
01. On the other hand, the "Message Coder" will only have: "TEXT", "IMAGE", "MESSAGE".


Look Ma, No Underlines:
Now that you are quite familiar with how the toolbar looked like on "Message Builder" or "Message Coder", it's time to get rid of some unwanted underlines.

Let's choose our preferred message editor first (Message Builder or Message Coder). Please follow these steps:
01. Click on the "Email" tab.
02. Click on the "Messages" option. This should take you the "Create an Email Message" page where you can choose between "Message Builder" or "Message Coder".


Removing Underline(s) When Using the Message Builder:
Let's say we choose the "Message Builder", and then used the pre-built "One-Section" template.
01. We just checked on the "Basic" checkbox from the pre-built templates selection screen.
02. We choose the "One-Section" temlate for this example.


01. For this example, let's just type in the word Google, and highlight the whole "Google" word.
02. Click on the small icon that looks like a chain on the upper part toolbar. This should show "Insert link" when you hover your mouse on it.
03. This link popup box should appear after clicking on the icon mentioned in 02.
04. Type in the URL that you want to open when someone clicked on the word Google.
05. Click on the "ok" button.


So this is what we'll get. Three words that has their hyperlinks set to http://www.google.com. Not to mention, all of them are underlined by default. As you will notice, only the "MESSAGE" option from the toolbar is usable, the rest are grayed out.


01. Move your mouse cursor anywhere within the block. The light blue block indicator should appear.


01. Click anywhere on the said block, and other options from the toolbar should now be usable.
02. Click on the "BLOCK" option from the toolbar. This menu option should expand to show "BACKGROUND", "BORDERS", "SPACING", "ADVANCED".
03. Click on the "HTML" button that shows below the "ADVANCED" option, and a popup box should appear.
04. This popup box appears when you clicked on the "HTML" option below the "ADVANCED" toolbar.
05. Click on the "continue" button.


From here look for the <a href='http://www.google.com/'>Google</a>. You should spot three in this example.


01. Insert the CSS {style='text-decoration: none;'} (opening and closing brace symbols are not included) after the {<a href='http://www.google.com/'}. The complete code should be {<a href='http://www.google.com/' style='text-decoration: none;' >Google</a>}. There will be times wherein you will see other characters not shown in this example but there shouldn't be any issue as long as you follow the pattern.
02. Once all links are replaced, you can click on the "check code and preview" button.


01. After clicking on the "check code and preview" button mentioned above, your iContact software will check if the codes you typed in are valid. Just click on the "apply code" button if no errors are found. There will be time when this checker would recommend other codes. For now, let's just focus on what we're trying to accomplish. Notice how those three underlines disappeared.


Removing Underline(s) When Using the Message Coder:
Doing this using the "Message Coder" is a bit straightforward. To get a same exact copy of our work from "Message Builder" to "Message Coder", what you can do:
01. Click on the "MESSAGE" option. This should expand and show "BACKGROUND", "BORDERS", "SPACING", "CHECKS", "ADVANCED".
02. Click on the "SOURCE" button just below the "ADVANCED" option. A popup box containing all the HTML codes that comprises the newsletter we are working on.
03. Click on the "export to messagecoder" button.


This is what we'll most likely get. The screenshot below shows the "Design" portion of our "Message Coder".


To see the HTML codes:
01. Click on the "HTML" button just below the "EDITOR STYLE" option.
02. All the HTML codes will be display on the "Message Coder" editor as shown below.


01. From here, the solution would be really simple. Look for the <html> and <body> tags. From here you can just insert the "<style type="text/css">a {text-decoration: none}</style>" between the <html> and <body> tags. The complete code should look like this: "<html><style type="text/css">a {text-decoration: none}</style><body>".


You will see the results when you go back to the "Design" mode of your "Message Coder". Furthermore, the solution we used for the "Message Builder" part should also work for this. You'll just have to look for the respective <a>...</a> tags.


Saturday, February 15, 2014

The Email Address Associated With Your iContact Account


The email address associated with your iContact account is the one that receive notifications whenever a change occur in your iContact account. Receipts may be also sent to this email address upon request from an iContact Technical Support representative. Examples are:

1. Billing notifications, and receipts.
2. Contact is added or removed to one of your lists.
3. Password reset.
4. Other features that may require notifications.


Take Note:
Losing access to this email address can give you a lot of frustration as all requests that need account modification must all be sent from this email address.


Where Do You Find The Email Address Associated With Your Account?
Finding and changing the email address associated with your iContact account is really straightforward. Please check on the steps below for your reference:

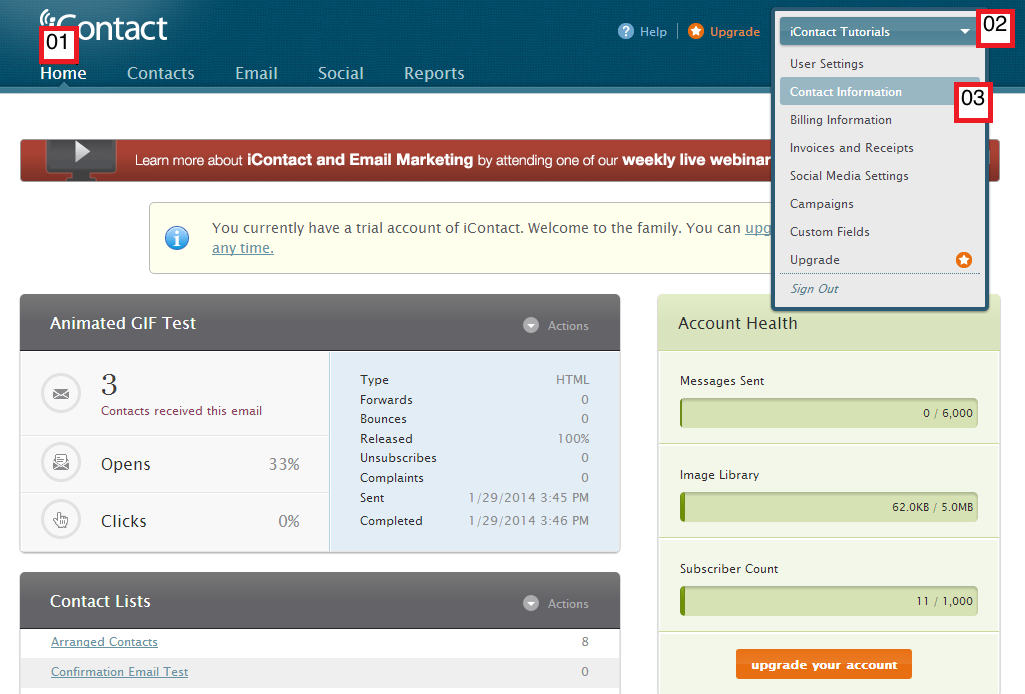
01. Click on the "Home" tab of your iContact account.
02. Click on the "small arrow pointing downwards" icon on the right part where your name appears to reveal the drop-down menu.
03. Click on the "Contact Information" option.


Clicking on the "Contact Information" as directed above should bring you to your "My Contact Information" page.
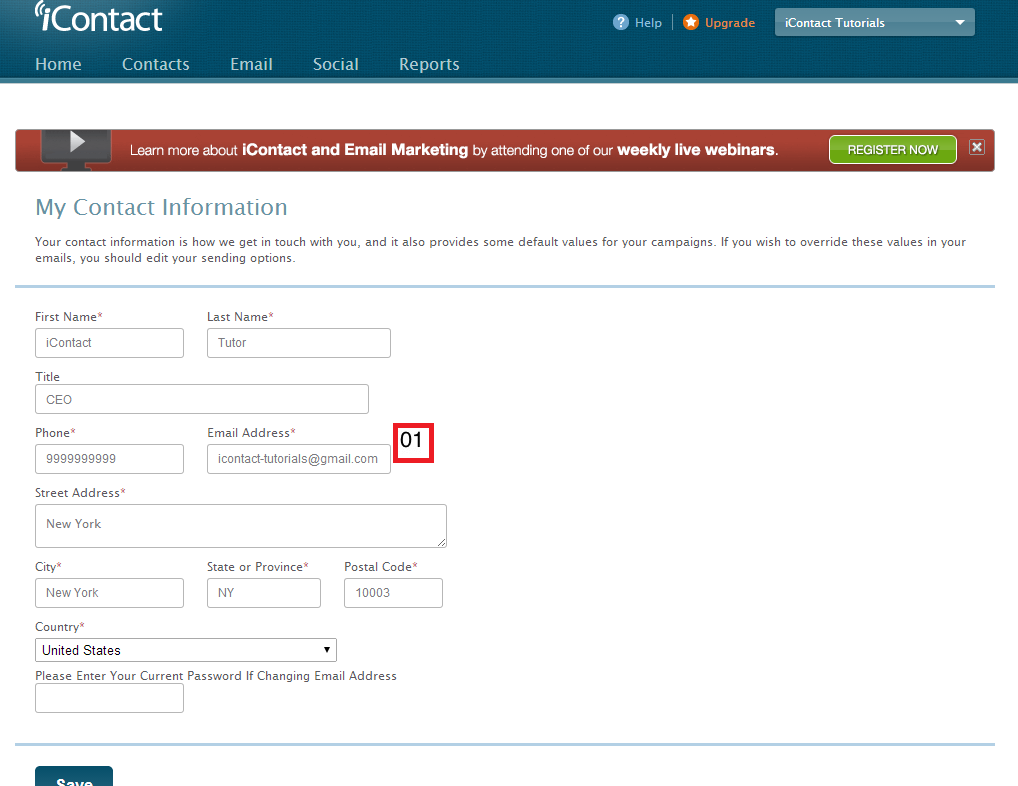
Whatever email address you show on this page will be the email address associated with your iContact account.

01. This part should show the email address associated with your iContact account.


Furthermore, you may change this email address at any time. Your current password is needed if you want to change this email address. Notice the blank field that says "Please Enter Your Current Password If Changing Email Address" just above the "Save" button.


Wednesday, February 12, 2014

Arrange Your Contacts Alphabetically Or Chronologically


Having numerous contacts can be very stressful especially when comparing two or more lists with each other. By default, iContact does not display your contacts in alphabetical (email addresses, first names, last names) or chronological (dates your contacts were added). iContact has a feature that can actually do this for you. This is a simple one-click that a lot of subscribers tend to miss.


In the example below, some garbled email addresses are used for testing this procedure. Notice how the "Email Address" field got alphabetized when it was clicked.
01. Click on your "Contacts" tab.
02. Click on the "Browse Contacts" option just below it ("Contacts" tab).
03. Simple click on any of the fields that shows: "Email Address", "First Name", "Last Name", "Added On" on top of where your contacts are listed.


Alphabetized, anyone!?
Your iContact account is extremely straightforward, there are times when you also need to be keen on details to figure these small but superbly useful features.


Your iContact Image Library


Email messages / newsletters without pictures or images can be dull and boring. A good looking newsletter is the best way to spark the curiosity of your prospects or would be prospects. Since not all email clients / editors has the ability to embed images in their email messages, most email marketing software normally display images using the <img src="url of your image file"> HTML code.


Ways To Access Your iContact Image Library
1. From The Image Tab.
2. From The Message Builder Or Message Coder.


Accessing The Image Library From The Image Tab:
There are two ways to access the "Image Library" page from your "Email" tab. Please take a look on the instructions and images below.

Process 1:
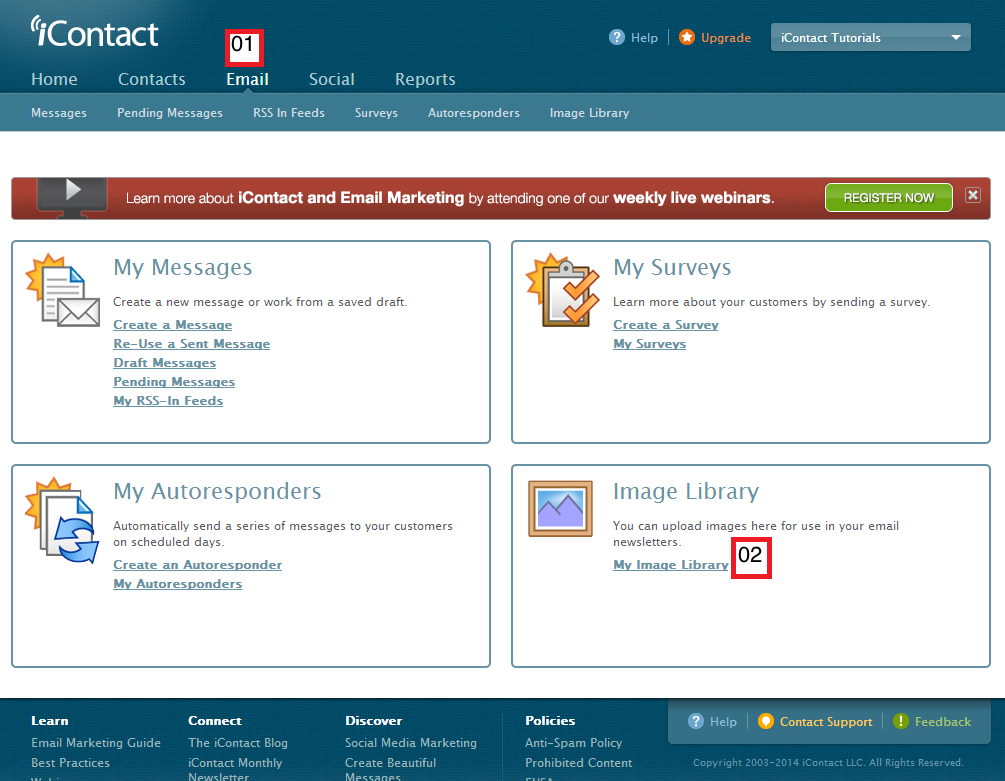
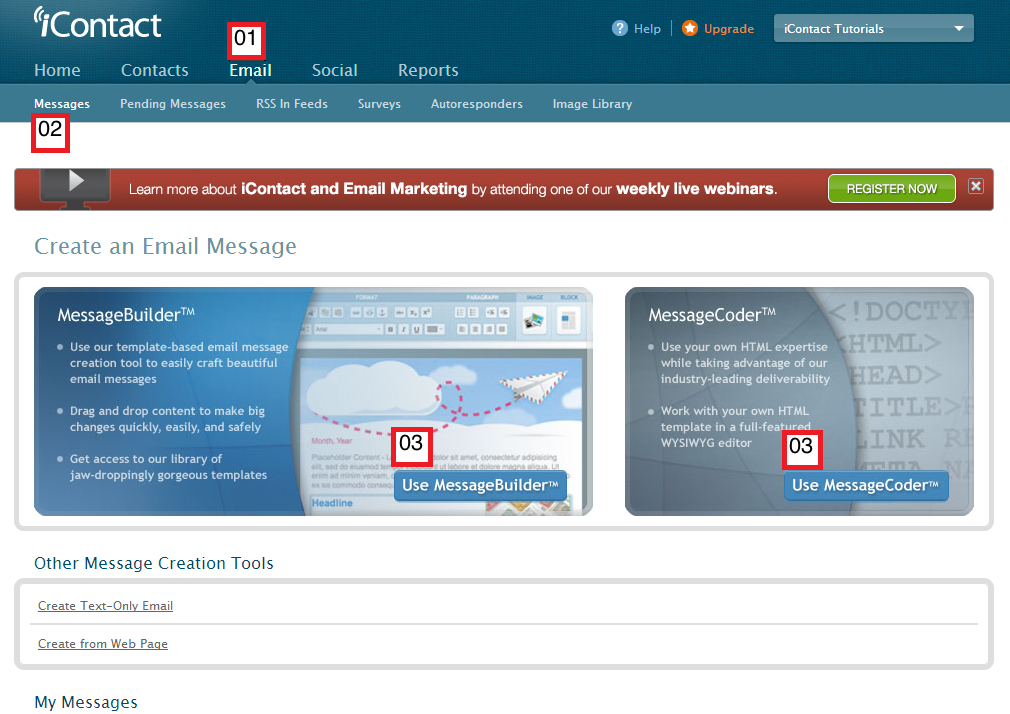
01. Click on the "Email" tab on the upper part of your iContact.
02. Click on the link that says "My Image Library" on the lower left part. This should take you to your "Image Library" page.


Process 2:
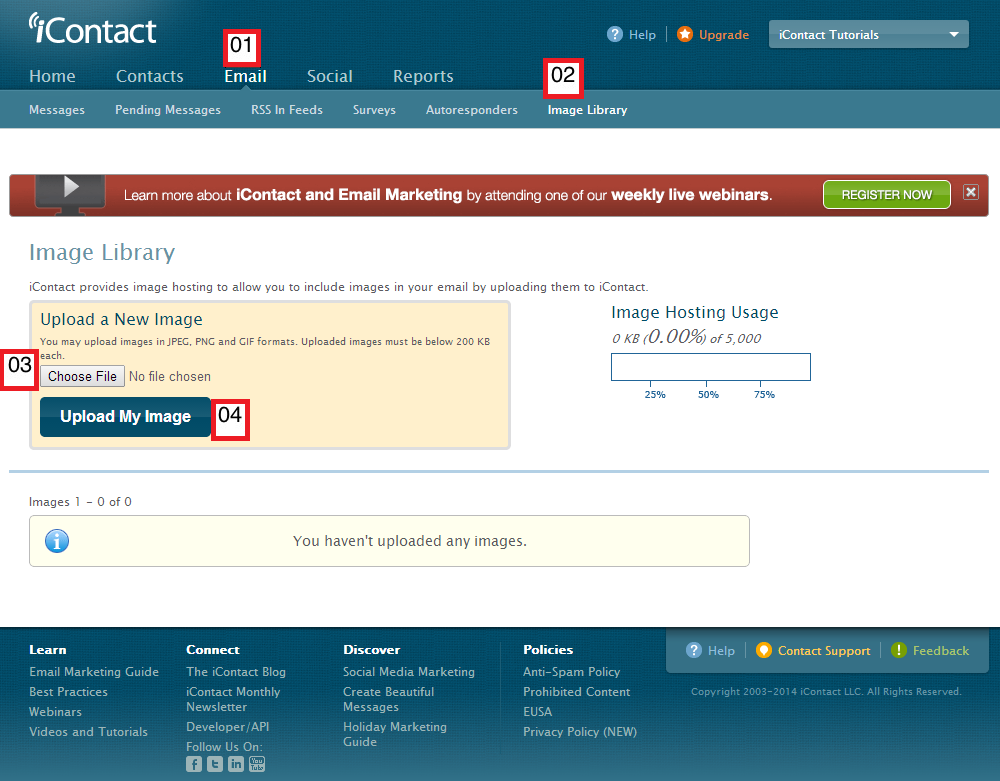
01. Click on the "Email" tab on the upper part of your iContact.
02. Click on the "Image Library" on the right part of that menu bar that says "Messages", "Pending Messages", "RSS In Feeds", "Surveys", "Autoresponders", "Image Library".
03. You may upload an image file from your computer by clicking on the "Choose File" button, then a popup that will provide you the option to choose which file from your computer you want to upload to your "Image Library" should appear.
04. Click on the "Upload My Image" button after choosing the image file you want to upload.


Accessing The Image Library From The Message Builder Or Message Coder:
First you need to access your "Create an Email Message" page, please follow these steps:
01. Click on the "Email" tab.
02. Click on the "Messages" option.
03. Either you choose the "Message Builder" or the "Message Coder".


Access the "Image Library" from your "Message Builder":
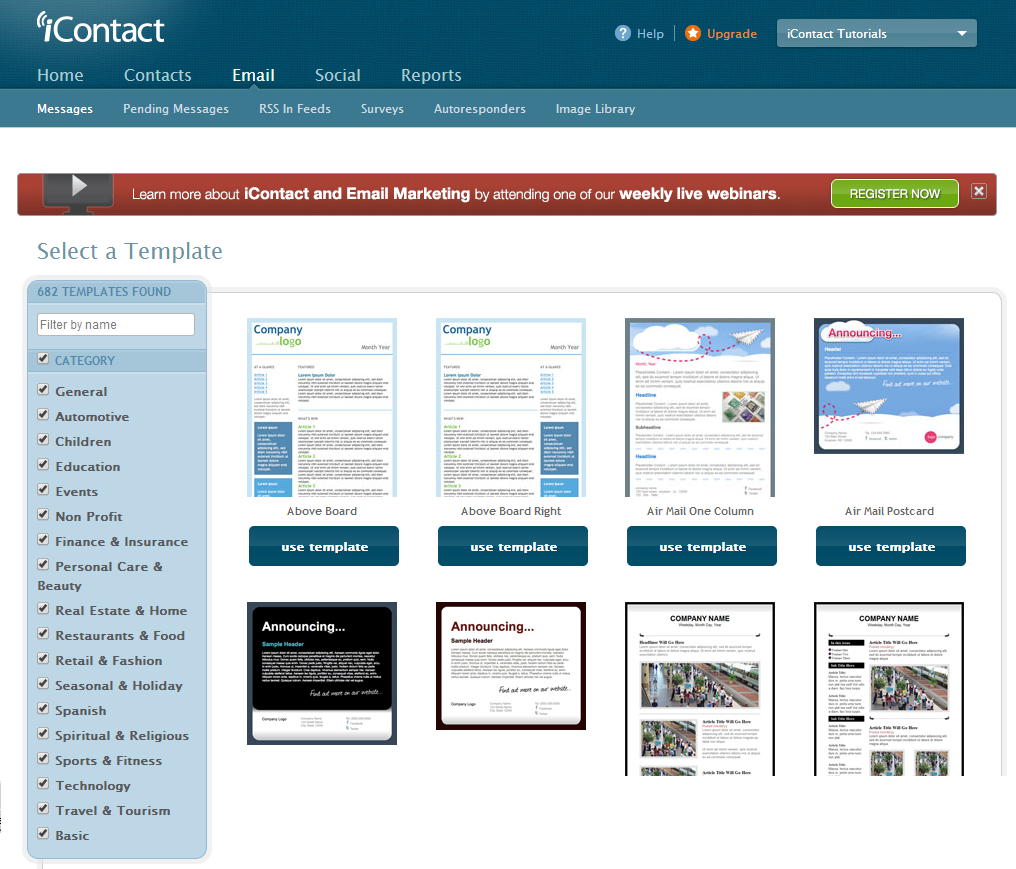
From the screen shot above, if you choose to click on the "Message Builder" option, you will be taken to a screen that allow you to choose among some pre-built email / newsletter templates.


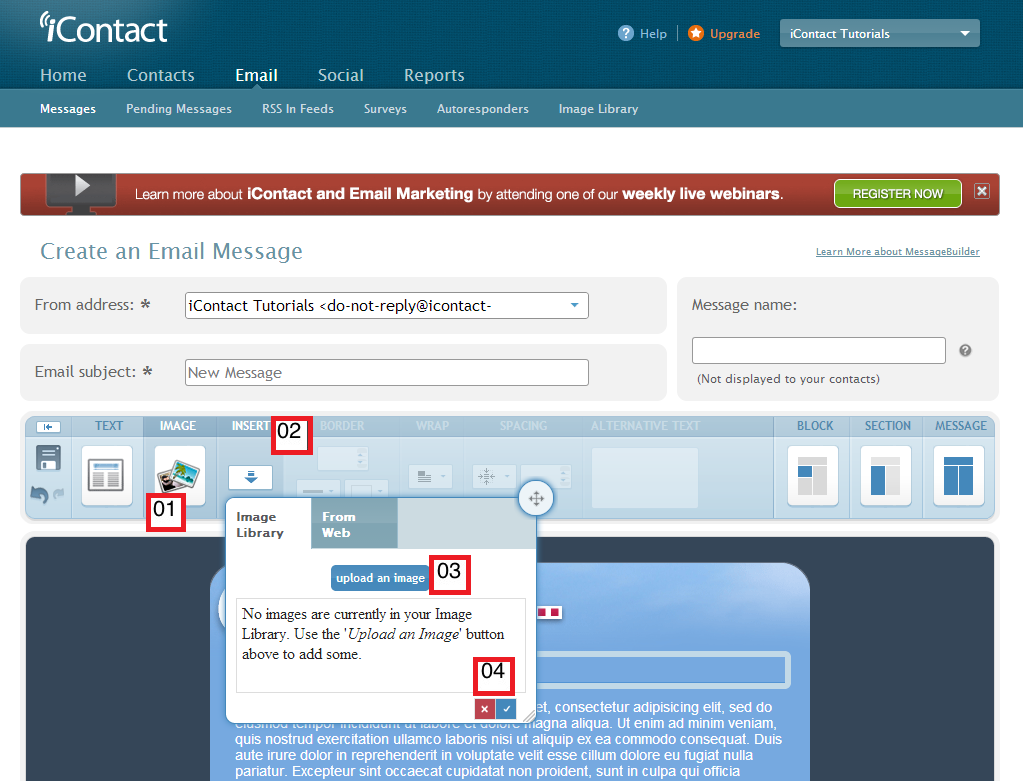
After choosing the email / newsletter template that suits your preference, the browser should show your "Create an Email Message" page similar to the page below.
00. Click on the part where you want your image to appear on the email / newsletter that you are working on.
01. Click on the "IMAGE" option on the upper part (where it says "TEXT", "IMAGE", "BLOCK", "SECTION", "MESSAGE").
02. Click on the "INSERT" option beside where it says "IMAGE". A popup box should appear, and will give you the option to choose between "Image Library" and "From Web".
03. Clicking on the "upload an image" button should show another popup that will allow you to choose the image you want to upload from your computer.
04. These are buttons that you click if you want to cancel or confirm your "Insert Image" task.


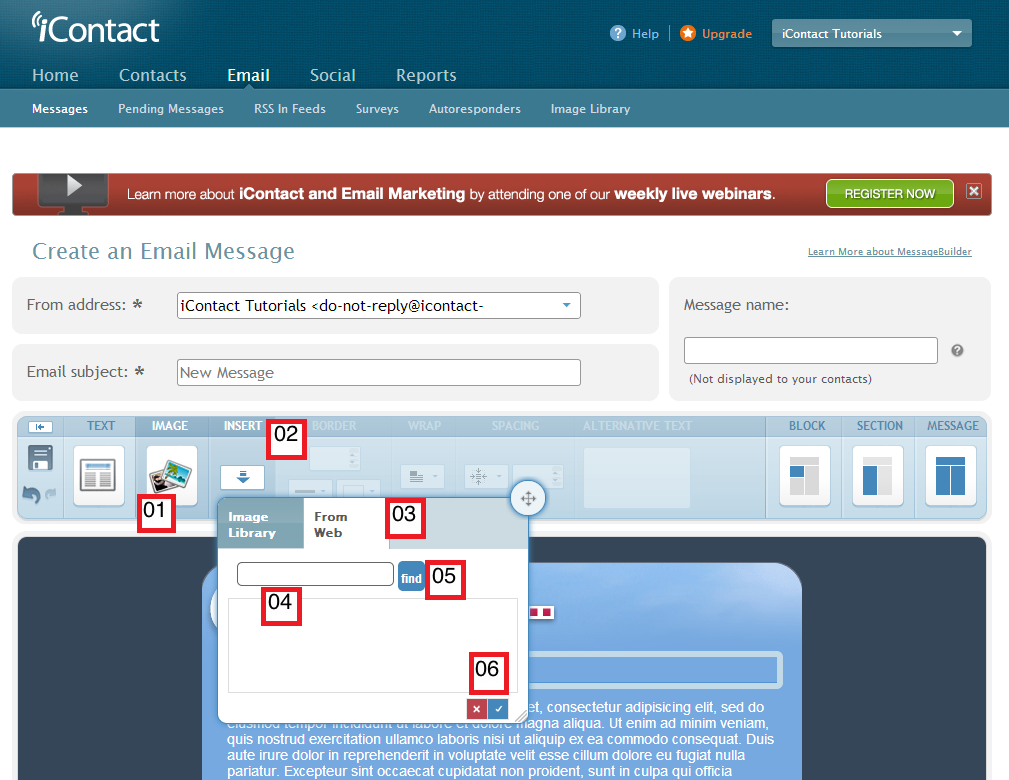
On the other hand, since the iContact "Image Library" only accept image files that are 200 kb (or below) in file size, some email marketer host their images in third party hosting such as Photobucket and Picasa Web. Then they use the "From Web" option of their iContact "Image Library".
00. Click on the part where you want your image to appear on the email / newsletter that you are working on.
01. Click on the "IMAGE" option on the upper part (where it says "TEXT", "IMAGE", "BLOCK", "SECTION", "MESSAGE").
02. Click on the "INSERT" option beside where it says "IMAGE". A popup box should appear, and will give you the option to choose between "Image Library" and "From Web".
03. Choose the "From Web" option.
04. Type in the URL of the image file that is hosted on your Photobucket or Picasa Web or whatever you hosting you use.
05. Click the "find" button and iContact where locate the image on the URL that you've typed in.
06. These are buttons that you click if you want to cancel or confirm your "Insert Image" task.


Access the "Image Library" from your "Message Coder":
With the "Message Coder", you should be in the
01. "Design" (view) under the "Editor Style" option to utilize the "INSERT" (image) option / popup shown above.


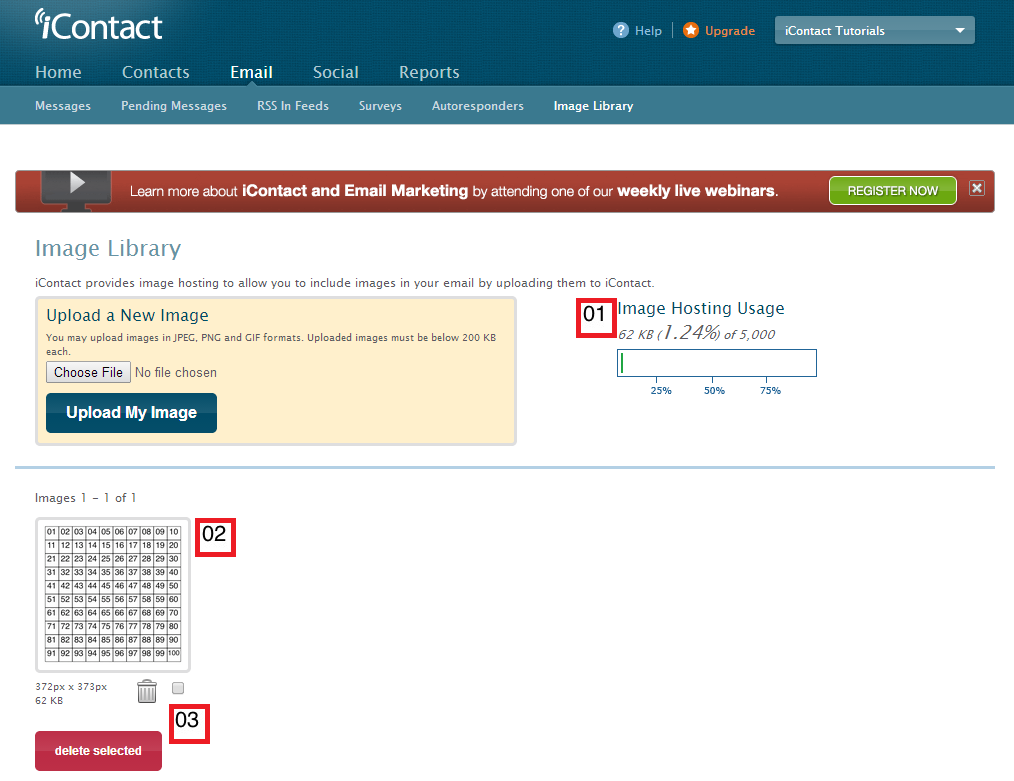
This is how your "Image Library" would look like if it has content(s) in it:
01. Shows your "Image Library's" storage capacity.
02. Thumbnail of your image file.
03. The trash bin icon is used for deleting image(s) you no longer need. The check box icon (beside the trash bin icon) is used for selecting / de-selecting image(s) for possible mass deletion in case you want to use the "delete selected" button.


iContact Tutorials Copyright © 2014 -- Based on design by O Pregador