This website offer some workarounds for you to maximize the use of your iContact Email Marketing software. Please bear in mind that iContact has a built-in knowledge base that may contain more updated information. You may want to check it from time to time if you haven't done so. You should find it on the upper right part (near) where your drop down menu is located. This is represented by "01" in the screenshot above.

Showing posts with label Unsubscribe. Show all posts

Wednesday, March 19, 2014

Browse Contacts


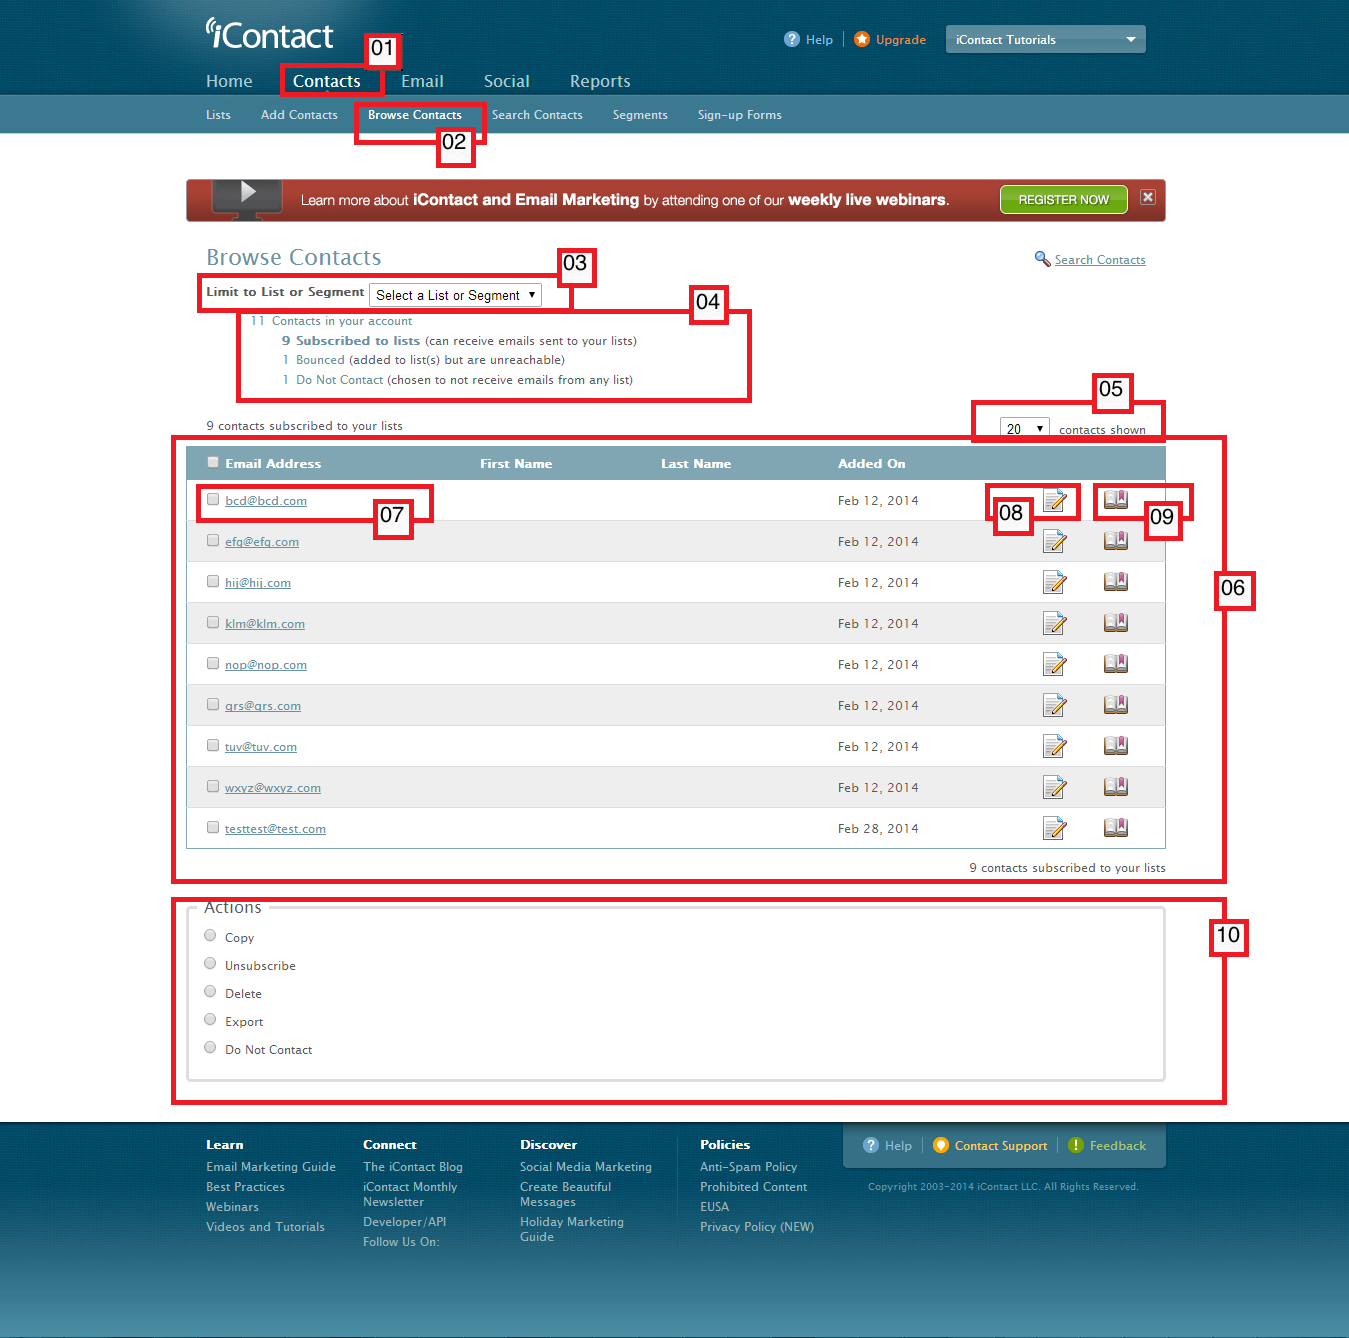
The iContact Email Marketing software's "Browse Contacts" feature is very straightforward. This function allows you to take a look on the email addresses included in your list(s). The "Browse Contacts" page should also allow you to edit each contact's profile and view their history. A contact's history contain information such as when the contact was added to list(s), sent messages, bounced messages, and so on. This page should also allow you to do certain functions like (or put the contacts to a certain status) "Copy", "Move", "Unsubscribe", "Delete", "Export", "Do not contact".


01. To go to the "Browse Contacts" page you must first click on the "Contacts" tab, which should take you to the "Contacts" tab page. A dark blue bar should also appear just below the "Contacts" tab that you just clicked, and should give you more options; "Lists", "Add Contacts", "Browse Contacts", "Search Contacts", "Segments", "Sign-up Forms"
02. Clicking on this "Browse Contacts" option should bring you to your iContact Email Marketing software's "Browse Contacts" page.
03. This portion provides you a drop down selection to choose which list(s) or segment(s) you want to browse.
04. This part should display some sort of summary about the total number of contacts you have in your account. How many of them are subscribed, got bounced, placed themselves in "Do Not Contact", and so on.
05. A convenient "display limiter" that allows you to set the number of contacts you want to iContact Email Marketing software to display for browsing. At the time of this writing, it gives you option to display 20, 50, 100, or 200 contacts at a time.
06. Just below the "display limiter", the contacts are display along with information such as first names, last names, the date they were added to the list you are browsing.
07. Left pane shows the email addresses of your contacts.
08. This is the icon for the "Edit Contact Profile". Clicking on this icon takes you to a page where you can modify your contacts' first name, last name, and so on.
09. This is the icon for the "View Contact History". Clicking on this icon takes you to a page where you see when your contacts were added, if they unsubscribed, and so on.
10. This part shows the "Actions" that you can do to your contacts' information.


Friday, February 28, 2014

Changing The "From Name" And The "From Email Address"


A good email marketing software should allow you to create different "From Names" and "From Email Addresses", and allow you to send email messages / newsletters using whichever "From Name" and "From Email Address" you prefer. For example you run 3 businesses, or let's just say that your company has three main departments and each need to send out email messages / newsletters to their respective target audience.

For this example we will use the 3 imaginary departments of iContact-Tutorials:
1. iContact Tutorials
2. iContact Research
3. iContact Tutorials R&D

For the sake of formality, it is just proper to use multiple "From Names" / "From Email Addresses" for each of the above-mentioned departments. The screenshot below shows the "From Address" field that can be seen on the upper part of your iContact's message editor.
01. Clicking on the small arrow icon pointing down on the left part of the "From address: *" should show a drop-down selection of all the "From Names" and "From Email Addresses" you have. These "From Names" and "From Email Addresses" are also known as "Campaigns".


To have multiple "From Names" / "From Email Addresses" to use we have to know where and how to create or edit "Campaigns" on your iContact Email Marketing software. The first two steps for creating / editing are:
01. Click on the small arrow icon on the upper right part where your name appears. This should show a drop-down menu.
02. Click on the "Campaigns" option from the drop-down menu. This should take you to the "Campaigns" page.


Once in the "Campaigns" page you may now create or edit your campaigns. The admin of iContact-Tutorials recommends to just maintain a maximum of three campaigns, unless one needs more. The main reason is that these "Campaigns" cannot be deleted.
01. Clicking an clickable links or icons here should allow you to modify the corresponding campaign.
02. This "Create A New Campaign" allows you to create a new campaign on your iContact Email Marketing software.


The instructions from the above-mentioned screenshot should take you to your iContact Email Marketing software's "Edit a Campaign" page. From here, you should be able to type in the information that will be associated with the campaign that you are creating/editing.
01. "Campaign Name", this field is required. The function of this is no other than to put a name to the campaigns that you are creating.
02. "Campaign Description" is optional but then again, some extremely organized people finds typing descriptions useful.
03. "From Name", this field is required. This is the part where you type in the name that will show on the "From Name" field of the email messages / newsletters you will be sending.
04. "From Email Address", a required field where you type in the email address that you would like to appear on the "From Email Address" fields of your recipient's email client.
05. From here you can set your iContact Email Marketing software to track or not track the clicks that your recipient's would be doing.
06. Under the section 4 of the CAN-SPAM Act of 2003 (http://www.business.ftc.gov/documents/bus61-can-spam-act-compliance-guide-business): "Your message must include your valid physical postal address. This can be your current street address, a post office box you’ve registered with the U.S. Postal Service, or a private mailbox you’ve registered with a commercial mail receiving agency established under Postal Service regulations."
It is here where you type in the address for your business.
07. Going back to the sections of the CAN-SPAM Act of 2003, particularly on section 5: "Your message must include a clear and conspicuous explanation of how the recipient can opt out of getting email from you in the future. Craft the notice in a way that’s easy for an ordinary person to recognize, read, and understand. Creative use of type size, color, and location can improve clarity. Give a return email address or another easy Internet-based way to allow people to communicate their choice to you. You may create a menu to allow a recipient to opt out of certain types of messages, but you must include the option to stop all commercial messages from you. Make sure your spam filter doesn’t block these opt-out requests."
This is the part where you setup the word or phrase that your recipients need to click in the event that they no longer want to receive email messages from you or update their subscriptions from you.
08. "Forward-to-a-Friend", should you choose to have one - this feature should put a link that your recipients can use if they want to forward (to their friends) the email message / newsletter you sent them. The importance of this feature is discussed in a different article.
09. Your usual "Save" and "Cancel" buttons.


Just fill out all the required fields from your "Edit a Campaign" page, then click on the "Save" button described from the screenshot above then you're done. Nothing fancy.


iContact Tutorials Copyright © 2014 -- Based on design by O Pregador