Social media platforms such as Facebook, Twitter, and LinkedIn are the talk about nowadays. Used correctly, these social media platforms are powerful tool in promoting whatever you got from your "emo status updates" to your "serious money-making business". Imagine, you can reach out to possible prospects from any place in the world with these social media platforms without spending a penny to travel to their place. Facebook, Twitter, LinkedIn would just deliver your email message / newsletter right in the room where their computers are located.
iContact has a built-in module that allow you to post the advertisements, flyers, email messages, newsletters you have created. In a perfect scenario, you don't need to log on to your social media platforms to post update(s) to your Facebook, Twitter, and LinkedIn accounts. Once your social media accounts are integrated with your iContact, you only need to go to your iContact Email Marketing software's "Social Media" page to do all these.
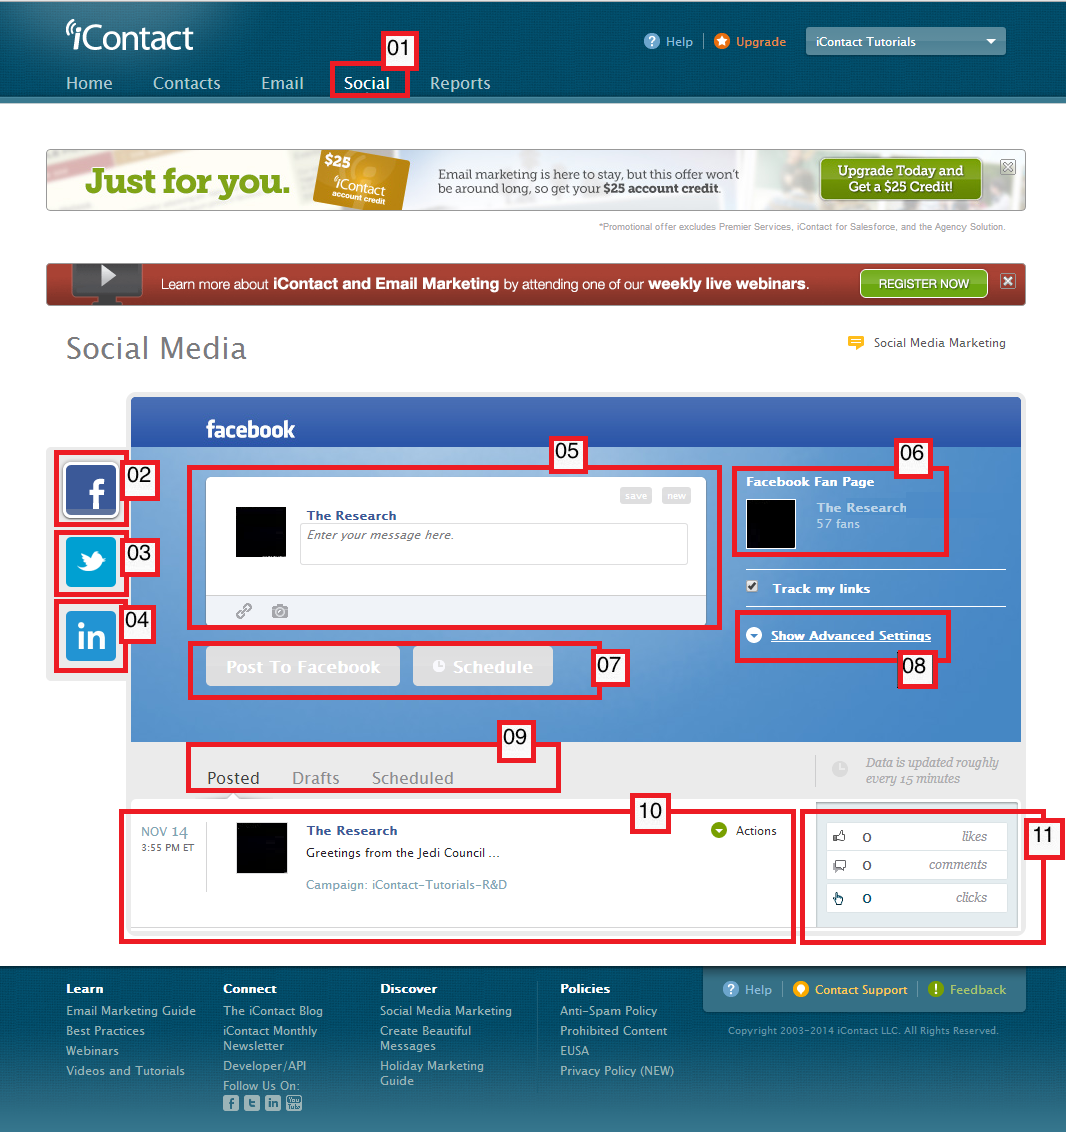
Below is an overview of what you can expect in your iContact Email Marketing software's "Social Media" page.
01. The "Social Media" page can be accessed by simply clicking on the "Social" tab of your iContact Email Marketing software. The "Social" tab can be seen on the upper part along with the other tabs such as "Home", "Contacts", "Email", and "Reports".
02. A Facebook logo will be shown here. If you click this Facebook logo, it should allow you to choose the Facebook page you intend to post your updates.
03. The Twitter icon is located just below the Facebook icon. Clicking on this Twitter icon should also allow you to choose the Twitter page you want to post your updates.
04. The LinkedIn icon should be found just below the Twitter icon, which should have the same purpose like the two above-mentioned social media icons.
05. Each of these social media icons will have a corresponding text box where you can type in whatever updates you want to show your Facebook, Twitter, or LinkedIn contacts.
06. Just beside the above-mentioned text box, there will be an indicator that shows you a quick glance on which social media page will show the updates that you will be posting.
07. There will be two buttons below the text box where you type in your updates, one button should allow you to post your updates immediately and the other one should allow you to schedule your social media post(s) on the date and time of your choice.
08. The "Show Advanced Settings" on the other hand allows you to choose the campaign for categorizing the post.
09. "Posted", "Drafts", and "Scheduled". These will classify your updates if you have chosen to post them immediately, or scheduled them, and so on.
10. Your updates, post or not posted, will be shown on each respective categories. Be it "Posted", "Drafts", or "Scheduled".
11. This will only be visible for Facebook updates posts as it will show the number of "Facebook Likes" you got, the umber of comments on your post(s), or if someone even bother to click on your Facebook post(s).

Your iContact Email Marketing software's "Social" tab works alongside with your iContact Email Marketing software's "Social Media Settings" page. This is the one the you access by clicking on the upper right part (where a small arrow icon is pointing downwards), to reveal a drop down menu, then choosing the "Social Media Settings" option.


