This website offer some workarounds for you to maximize the use of your iContact Email Marketing software. Please bear in mind that iContact has a built-in knowledge base that may contain more updated information. You may want to check it from time to time if you haven't done so. You should find it on the upper right part (near) where your drop down menu is located. This is represented by "01" in the screenshot above.

Showing posts with label List Name. Show all posts

Monday, March 24, 2014

Lists


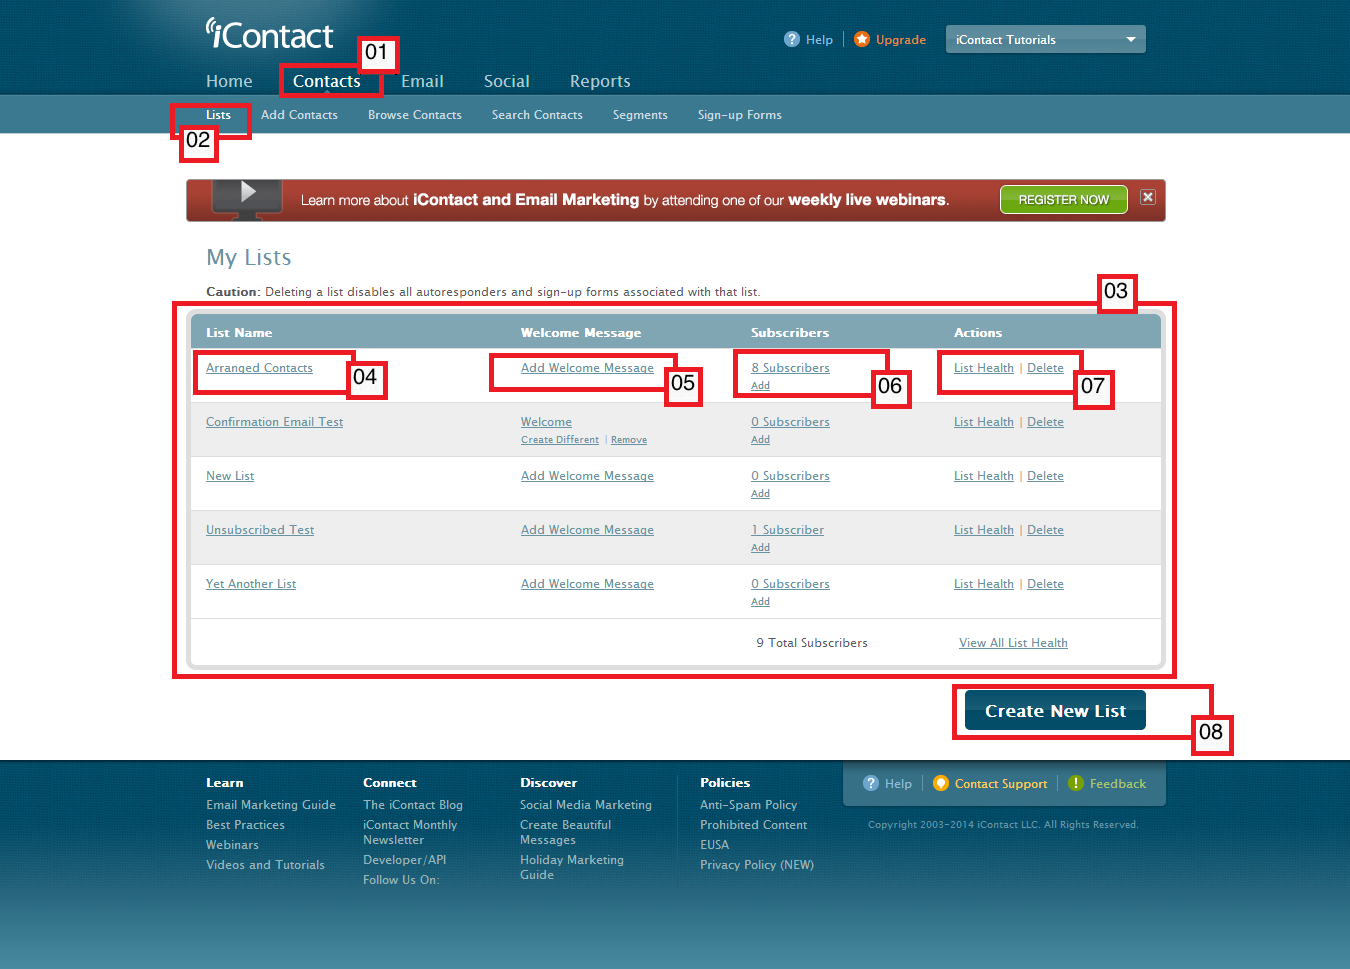
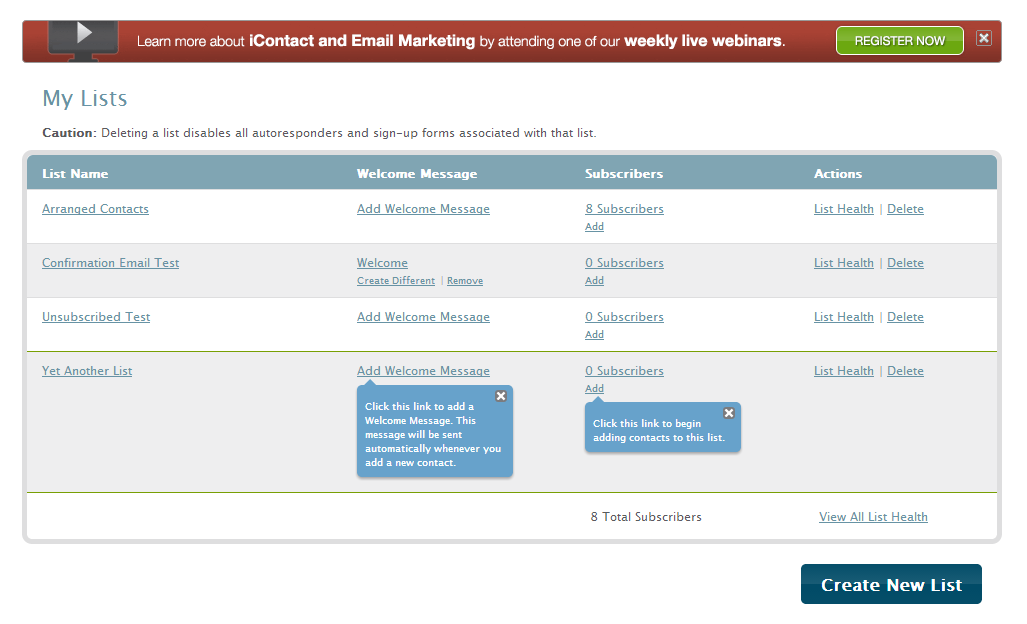
The "My Lists" page shows you the name of your list(s), and a quick information on how many subscribers are included in each list(s). The "My Lists" page should also allow you to create, delete, as well as view your list(s) health. You may also access the "Add Contacts to My Lists" page from here.


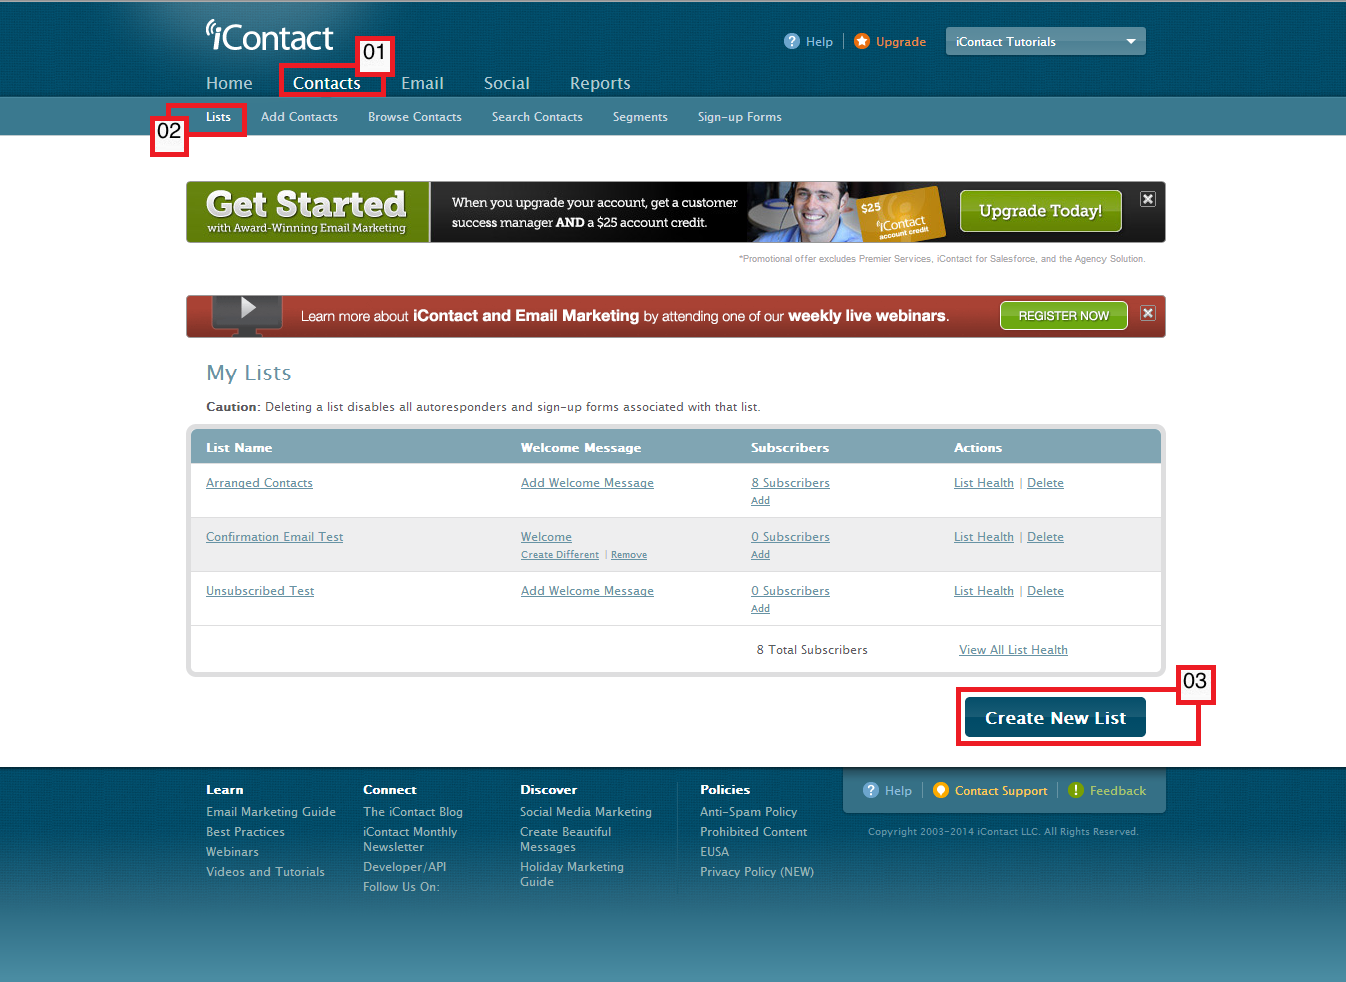
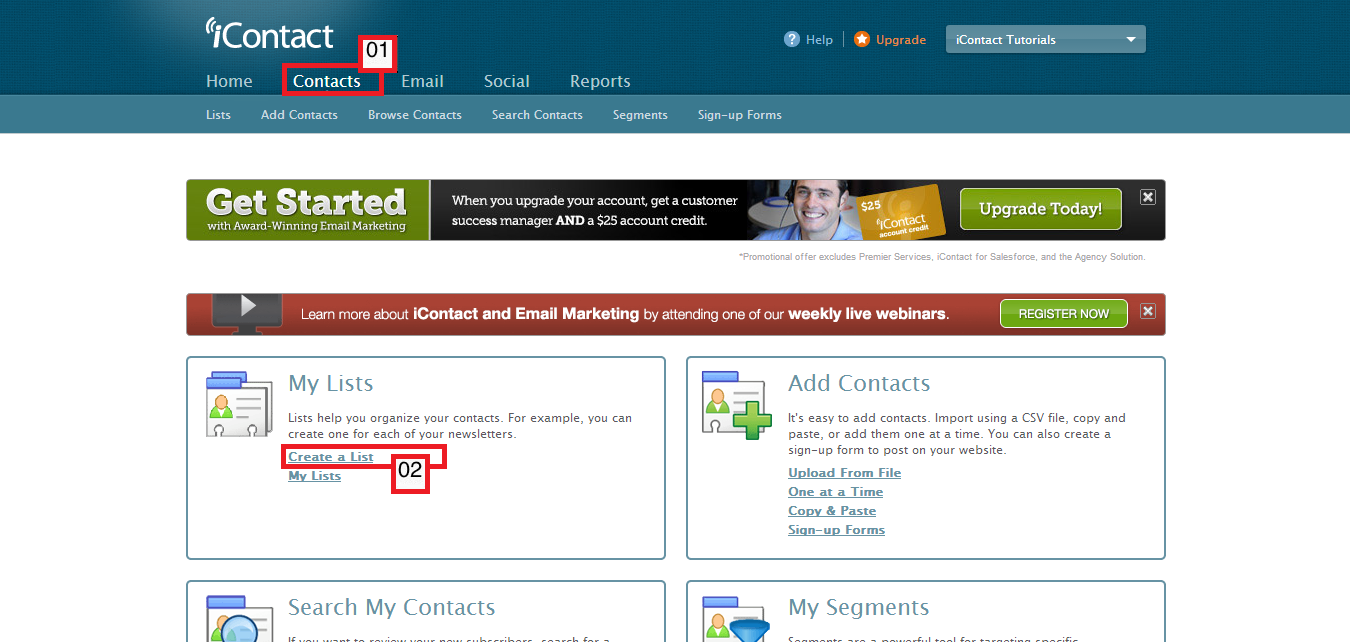
01. To go to the "My Lists" page you must first click on the "Contacts" tab, which should take you to the "Contacts" tab page. A dark blue bar should also appear just below the "Contacts" tab that you just clicked, and should give you more options; "Lists", "Add Contacts", "Browse Contacts", "Search Contacts", "Segments", "Sign-up Forms"
02. Clicking on the "Lists" option should take you to the "My Lists" page.
03. This is the part where all the information on list(s) name will be displayed. A quick count of the number of contacts will also be shown here, as well as the link for adding contacts, adding a "Welcome Message", delete list(s), and view list health.
04. This is the column where list(s) name are displayed.
05. The link to add a "Welcome Message" goes here.
06. On this part you should see a quick information on the number of subscribers, and the link to go to the "Add Contacts to My Lists" page.
07. If you would like to delete your list(s), you just need to look on this part of the page - you should see the "Delete" link. It is also beside the "Delete" link where you will see the "List Health" link, which should display the list health for you.
08. This is the button that you click to create a new list.


Wednesday, March 19, 2014

Browse Contacts


The iContact Email Marketing software's "Browse Contacts" feature is very straightforward. This function allows you to take a look on the email addresses included in your list(s). The "Browse Contacts" page should also allow you to edit each contact's profile and view their history. A contact's history contain information such as when the contact was added to list(s), sent messages, bounced messages, and so on. This page should also allow you to do certain functions like (or put the contacts to a certain status) "Copy", "Move", "Unsubscribe", "Delete", "Export", "Do not contact".


01. To go to the "Browse Contacts" page you must first click on the "Contacts" tab, which should take you to the "Contacts" tab page. A dark blue bar should also appear just below the "Contacts" tab that you just clicked, and should give you more options; "Lists", "Add Contacts", "Browse Contacts", "Search Contacts", "Segments", "Sign-up Forms"
02. Clicking on this "Browse Contacts" option should bring you to your iContact Email Marketing software's "Browse Contacts" page.
03. This portion provides you a drop down selection to choose which list(s) or segment(s) you want to browse.
04. This part should display some sort of summary about the total number of contacts you have in your account. How many of them are subscribed, got bounced, placed themselves in "Do Not Contact", and so on.
05. A convenient "display limiter" that allows you to set the number of contacts you want to iContact Email Marketing software to display for browsing. At the time of this writing, it gives you option to display 20, 50, 100, or 200 contacts at a time.
06. Just below the "display limiter", the contacts are display along with information such as first names, last names, the date they were added to the list you are browsing.
07. Left pane shows the email addresses of your contacts.
08. This is the icon for the "Edit Contact Profile". Clicking on this icon takes you to a page where you can modify your contacts' first name, last name, and so on.
09. This is the icon for the "View Contact History". Clicking on this icon takes you to a page where you see when your contacts were added, if they unsubscribed, and so on.
10. This part shows the "Actions" that you can do to your contacts' information.


Tuesday, March 18, 2014

The Contacts Tab


A number of cool features can be tapped when you access the "Contacts" tab. Features such as lists creation, contact search, adding contact(s) to one or more lists, segments creation and more. The "Contacts" tab is the second mostly clicked tab in your iContact Email Marketing Software.


You may access the "Contacts" tab by clicking on the upper part of your iContact Email Marketing Software where it shows "Contacts". This should be in between the "Home" and "Email" tabs.


01. This is the link that you need to click to take advantage of the features the "Contacts" tab contain.
02. The "My Lists" portion takes you to a page that would allow you to view or create list(s).
03. The "Add Contacts" takes you to that part in your iContact Email Marketing software that will allow you to upload your contacts' email addresses or create a sign-up form for your Facebook or HTML-based websites.
04. This "Search My Contacts" category allows you to go to that part in your iContact Email Marketing software to search for a specific email address by typing it on a search box, or browse the email addresses contained in your list(s).
05. "My Segments" would then allow you to go to a page where you can create or edit your iContact Email Marketing software segments. Segments are a powerful tool for targeting specific subscribers.
06. The dark-blue bar that gives you the options under the "Contacts" tab. As of this writing, it shows "Lists", "Add Contacts", "Browse Contacts", "Search Contacts", "Segments", "Sign-up Forms".


To wrap things up, the "Contacts" tab is what you will most likely access if you are doing these tasks:
  • Browse your list(s) and its respective contacts.
  • Create / edit / delete your list(s).
  • Create / edit / delete segments.
  • Create sign-up forms that you can use with your Facebook or HTML-based websites. Other platforms like WordPress would need a third party widget / API.
  • Edit your contacts' personal information such as first nasme, last names, and so on.
  • Search a contact by typing in their email address.
  • Upload the email addresses of your contacts to any list(s) of your preference.
  • View your contacts' history.

Friday, February 28, 2014

Creating A List


List is one of the most important aspects of email marketing as it is the easiest tool you can use to categorize your email contacts. The other tool being "Segment", is discussed on a different article. Let's say you have 500 contacts coming from different field of endeavors such as gaming, academics, government, and aerospace. 100 of them came from the academics sector, 50 from the government, 100 from the aerospace sector, and 250 from the gaming population for example. What one may want to is to create 4 different lists, and then associate all the 500 contacts with their respective list.


Creating lists using your iContact Email Marketing Software is very straightforward. To create a list on your iContact account, please follow these steps:
01. Click on the "Contacts" tab. This should display the "Contacts" tab's options on the dark blue bar below it.
02. Click on the "Lists" option from here, which should take you to your "My Lists" page.
03. Click on the "Create New List" button. This should take you to your "List Settings" page.


Another option would be:
01. Click on the "Contacts" tab. This should display the "Contacts" tab's options on the dark blue bar below it.
02. Click on the "Create a List" option that shows from the "My Lists" part. This should take you to your "List Settings" page.


The two above-mentioned set of instructions should take you to your "List Settings" page, where you can type in your preferred information for your list.


Once you are on your "List Settings" page:
01. The very first information you need to provide your iContact Email Marketing Software is your preferred name for the new list that you are creating. This field is required.
02. The next field is your "List Description". Although this field is not required, some extremely organized people finds it useful filling this field out. You may just want to type in some descriptions that will describe what type of contacts your lists will contain.
If you name your list "Gaming", then you may want to put in some texts on the description. Something like, "These contacts are hardcore video game players."
03. "Public List Label" is also optional. This will be a name for your list that will be seen by your contacts on their "Manage Your Subscription" pages.
04. Last but not list, you may click on the "Save" or "Cancel" buttons which should take you back to your iContact Email Marketing Software's "My Lists" page.


From this "My Lists" page you should be able to perform a number of tasks like:
1. Creating another list by clicking on the "Create New List" button.
2. Delete unwanted/unneeded list(s). This is true only if you have more than 1 list as the system will not let you delete if you only have 1 list in your "My Lists" page.
3. Add a "Welcome Message" to one or more of your "Lists". "Welcome Messages" are those sent to your contacts the moment they are added to your list(s) that has this option activated.
4. View the health of your list(s). List health would be composed of information such as your "Subscribed", "Unscubscribed", "Do Not Contact", "Pending", "Bounced", "Growth", "Total". This will be discussed in another article.
5. Go to the "Add Contacts to My Lists" page by clicking on the "Add" link that is found on the right part of each respective list name(s) you have.
6. Go back to the "List Settings" page of every list you have by clicking on the list name.


Now that you are done with creating your custom lists, it is time for you to add contacts to your iContact Email Marketing software. The "Adding Contacts To Your Lists" tutorial should guide you through.


iContact Tutorials Copyright © 2014 -- Based on design by O Pregador